What is RAM? Random Access Memory is a memory chip connected with the CPU via the front-side bus (FSB) or system bus. It acts as temporary or short time storage for data. RAM is highly volatile. It is the hub for the smooth functioning of your programs and system processes. Let us discuss how to clear RAM to carry out tasks more effectively.
When your system utilizes all the available Memory, your computer system performance will slow down automatically since it doesn’t have enough memory storage that requires completing the task. When you clear Random Access Memory, it will remove unwanted data from it. So that; the computer will have the capability to carry out their routine tasks.
Here let us discuss how to clear RAM. Let us discuss various methods and ways to free up the space and how to use RAM more effectively.
How to Free Up RAM:
-
Restart your Computer
To free up RAM in your computer, a straightforward thing you need to do is restart it. While doing so, the data stored in the volatile memory will be erased. So it will free up the RAM from the previously stored data related to processes and programs, including which were run behind.
Restarting your computer will free ups space by removing the background running processes and programs. Restarting your computer will flush the Memory and stop all tasks and processes running behind, including some of those that might have slowed down your system.
Rebooting halts the memory leaks. It reset all the programs and processes that are using Memory even after they were closed. When you restart your computer system, you flush out all the random and temporary data files bogging down your computer.
It speeds up the performance and stops memory leaks. Instead of Restart, it is better to use the Shut Down option. When you shut down your computer, it shut down the power supply and closes all programs running.
If you use the restart option, then power will not be cut down; therefore, there won’t be any stress on computer parts, including the hard drive. It only reboots the OS and clears Random Access Memory. Consequently, it is a wise choice if you use Restart instead of the Shut down option.
-
Updating the Software and Applications
It is crucial to be running the most updated versions of your computer operating systems and other applications software. Older versions of software and apps can take more Memory to process, causing your system to slow down. Some old programs may have memory leaks, and they don’t return memory to the pool during its use.
Such apps will consume more and more Random Access Memory and make the other applications running short of memory on the system. Installing the latest update of software will plug the memory leaks, and it can optimize and improve the efficient use of random access memory.
-
Use Different Browser
Some latest versions of Browsers consume more Memory. If you suspect your browser may be the reason, then try some other Light- browser available. Most of the popular browsers have better memory management. Everyone knows Google Chrome is a ravenous RAM-seeking monster. It hogs plenty of temporary Memory. Sadly, Google Chrome and Firefox use plenty of Memory.
-
Clear Memory Cache
After doing all the above, if the issue persists, you need to try deleting your cache. If your cache takes up a lot of space, then it takes more Memory. The cache holds on the information your system uses to reload the pages already visited without downloading the page information.
Sometimes some programs do not release the system memory they are using when closing. Those orphan threads work in the background and consume more Random Access Memory. It leads to slow down the performance of your computer. Use the following shortcut and clean up the Memory (%windir%\system32\rundll32.exe advapi32.dll, ProcessIdleTasks)
-
Browser Extensions:
The browser extensions are small mini-programs that allow some unique functionality to go hand in hand with the browser. Each browser supports these plug-in, browser extensions, or add-ons to use additional functionalities. Some browsers like chrome split every extension and tab into separate processes.
Though it is very convenient and prevents the entire system from crashing, it needs higher memory use since the browser needs to repeat the same process for each and every extension and tab. Further, their pre-rendering consumes more Memory. Additionally, different extensions are designed by different persons for different purposes.
Therefore they cannot go well together and resulting in more memory usage and slow down the system. You need to limit the extensions and themes that cause the browser to use more memory. If possible, enable hardware acceleration.
-
Use Light Apps:
If your system is lacking Memory, then it will start struggling. Therefore you need to manage your programs and applications. Instead of Photoshop, you can use Paint or GIMP for simple edits. Close any programs you are not using. Close the passive browser tabs. If you wish to read them later, bookmark them for later use. Close those programs do not need further.
-
Scan for Malware:
Rogue software may steal your Random Access Memory resources; therefore, it is better to scan your entire system for Malware.
-
Install More RAM:
If you are always running low on Memory and need to run more programs simultaneously, you need to install more Random Access Memory to your system. Adding more Memory will improve your system performance tremendously.
-
RAM Cleaners:
RAM cleaner utilities can help you to boost your RAM. They manage your computer memory more effectively and free up Memory for practical use.
-
Device Drive Issues:
Most of the Operating systems get periodic updates. And that could lead to corrupt some of the existing driver files. Besides, they may sometimes lead to Driver conflicts. They may lead to memory leaks and lead to excessive use of RAM resources. Therefore it is essential to check your computer system for any device driver issues with the help of the Device Manager.
Right-click on the This PC -> Go to Manage -> Select Device Manager. Expand each branch inside the Device Manager and look for any yellow exclamation mark icon. If you see such an alert, right-click on the device and select Update Driver. If your system is without any device issues, then it will run smoothly. And there won’t be any memory issues.
How to Clear RAM on Windows 10
-
RAM Hogs | How to Track Memory and Do Clean-up Process:
Your Desktop computers can be easily upgraded. Laptops and other devices have limited space; moreover, they may have been physically connected to the motherboard. Therefore they cannot be upgraded.
Therefore we need to find the reason for the RAM hogs. We can use either the process monitor or the task manager to figure out the culprit for it. Task manager is a window utility program. Generally, they are used to review the background processes and applications that are running behind. To use it, just right-click on the system tray, the task manager window will open.
Click on more details that will show you the processes and performances. From there, you can find and sort out the amount of Memory used by each application and process. You can dig out now which one is using the Memory for the extreme. Monitor and Review the application that consumes more resources and take possible steps to prevent it from doing so.
- Right, Click on the Task Bar (Either you can hold the Ctrl+Alt+Del keys to open the Task Manager).
- Select Task Manager.
- Click on the Performance Tab.
- Further select Memory to view the Memory in use.
- Then Select Processes Tab to find out which programs and processes are consuming more memory.
- Kill the right one to control the memory use.
Further, you need to examine those background apps that are running. Those background apps may overload the RAM and CPU. Close those unwanted tabs. Close those unwanted applications that are not in use. In addition, do not forget to close the background apps that are running. Since the background apps can restart themselves later, it is better to disable them manually in the startup menu.
-
How to Stop Running Background Apps:
In Windows, you can use some apps that can execute some work even when we do not work on that application. In Windows 10, you can use apps that continue to perform actions even when you are not actively in the App’s Window.
These are commonly called background apps. We can control the background apps using privacy settings. Desktop apps and programs are different from the background apps; therefore, you cannot view them in the privacy tap.
You need to visit the Settings Page to find the desktop apps and programs. Most of the apps downloaded from the Microsoft Store runs continuously to run in the background to show live tiles, notifications, update them, and download data.
Though they are helpful, they continuously run behind and exploit the system resources such as CPU usage. Therefore, they need to be controlled to save memory usage. If they are not checked, they will swiftly exhaust the Memory, battery power, and bandwidth.
To control background Apps:
- Go to Start
- Select Settings
- Select Privacy -> and then Background Apps
- Under Background Apps Turned Off the unwanted apps and services
It is an easy way to reduce RAM usage. Besides, it will prevent those unwanted programs from consuming Memory.
-
How to Cleanup Startup Programs:
Generally, startup programs are the programs that run automatically when you boot up your computer. If you have so many apps and programs in the startup, it can bog down the boot process.
Generally, most of the apps you install add themselves to the startup, thereby consuming more Memory. So we need to clean up the startup programs. The processes tab of Task Manager tells which programs use most of the Memory. You need to find the unwanted program that is no longer needed must be dropped out.
- Right, Click on the Task Bar (Either you can hold the Ctrl+Alt+Del keys to open the Task Manager).
- Select Task Manager.
- Click on Startup Tab
- Select and Click Startup Impact and organize the programs from high to low usage.
- Now disable the programs you preferred to do by right click on them.
-
How to Clean Page Files, When Shutting Down:
What is a page file? It is a physical extension of RAM. The paging file or page file is an optional hidden system file stored on your computer’s hard disk. The page files help the system to remove unwanted and rarely accessed and utilized pages from the physical memory so that you can use the physical Memory more efficiently for more frequently accessed pages. Deleting these page files helps you to get some extra memory. Besides, it won’t harm your data in any way. But Windows does not recommend you to delete those files.
Pagefile.sys is a virtual memory file stored on a local hard drive. It is crucial to speed your computer process and functions as an add-on to the Main Memory. It stores the inactive data in the form of page files to the drive, and the data can be swapped back as and when needed. A huge chunk of pagefile.sys will slow down your computer.
The page or swap files is a reserved portion of your hard drive, which is used as an extension of RAM for the DATA that has not been used more frequently and recently by the Random Access Memory. It can be read from the hard drive as a large chunk of data.
Since these page files are stored on Hard Drive, they won’t get cleared when we restart our computer. Clearing page files stored in the hard drive will get clear the RAM when shut down. Clearing page files will clear RAM. We can set it to remove automatically when our system shuts down. We can do that by making appropriate changes in the Registry Editor.
Steps to Follow:
In Windows 10, you need to enable this register key to 1 (by default, it is 0)
- Click Start Menu.
- Input “Registry Editor” in the Start Menu search window.
- Select “Yes” to edit Registry Editor to make appropriate changes.
- On the left side of the Window, select “”
- Scroll down to select “System.”
- Choose “CurrentControlSET”.
- Select “Control”.
- Scroll down to select “Session Manager.”
- Choose “Memory Management”.
- Select “ClearPageFileATShutDown”.
- Double click on the Right.
- Set the Value data field as “1”.
- Click OK and Exit.
Now you have enabled the Page File cleaning automatically when shutting down. I hope you understand how to delete pagefile.sys in Windows 10. You can do the same process with the help of Cortana also.
Warning: The Registry Editor is a powerful tool, and mishandling it can make your system inoperable or crash.
-
Modify the Visual Effects of Display:
Windows 10 comes with fancy visual effects such as taskbar animation, aero peek, and box and mouse. These are enabled by default. Therefore they consume a significant part of the memory and system resources and causing your computer to run slower.
Besides, Windows 10 has many visual effects for windows, such as menus, tooltips, and more. Those visual effects need more RAM. Therefore if you are running with a bare minimum of RAM, you need to disable the visual effects that can increase the memory resources. With limited storage, you can put some of the visual effects such as Animation for apps and icons to free up more Memory.
Here Are the Steps to disable Windows Visual Effects:
- Open File Explorer.
- Right, Click on “This PC.”
- Select Properties.
- Click on “Advanced System Setting.”
- Go to the “Performance” category.
- Select and Click “Settings.”
- Select “Adjust for Best Performance.”
- Save and Exit.
In this setting, all the special animated features are disabled. This will enable more free space in your Memory. But it limits your system’s appearance significantly. Later if you want, you can select the custom settings to enable all visual effects. Modifying or turning off the 17 visual effects in Windows 10 will increase available Memory.
That can result in a performance boost for Windows 10 systems. Turning off visual effects changes Windows 10 into a more responsive one.
How to clear RAM on Mac:
Is your Mac running very slow or hang? Do you frequently encounter “your system has run out of Application memory”? Those are the indicators that your Random Access Memory is being used to the maximum. Here are some times to help you to clean and optimize RAM in your Mac. We already discuss Random Access Memory is temporary storage for ongoing processes and programs. If your Mac is using maximum utilization of RAM, then you may face the following issues:
- Taking more time to load.
- Performance issues.
- Spinning beach ball.
- Flashing “Your System Has Run Out Of Application Memory.”
- Frequent Freezing.
- More frequent Crashing.
An easy way to overcome this issue is by upgrading your RAM. But it is not a feasible solution for everyone. Therefore we are providing you some easy tips and tricks to clear RAM on MAC.
-
Restart your Mac:
Restarting your Mac will address some of your memory issues, and it will free up RAM. Since your Random Access Memory is a volatile memory, it will clear your memory when you restart your Mac.
And your Mac will make things run smoother. Sometimes restarting your Mac system may not be possible. There is a possibility your system may hang, and you may lose your unsaved data. Similarly, it may not be possible to closing or reopening any programs or apps in the middle. So you need to do things wisely.
-
Update Your Mac OS:
Sometimes the problem may be related to the familiar issues with macOS. Therefore, it is very important to check whether you are running the most updated version of the OS. And you need to update the OS if necessary. The latest version of macOS is Big Sur.
-
Check Activity Monitor:
When your Mac slows down or any of the apps freezes, you need to check the Activity Monitor. The Activity Monitor is a pre-installed app that comes with your Mac. It is there in the Utilities.
It is similar to the task manager of Windows. Press Command+ Space Bar once that will bring the Spotlight Search Bar and type Activity Monitor into the Spotlight to bring it active. The Activity Manager will show you how much memory is being used by every application of your system. With its help, you could identify the App that is consuming more than the fair share of the available resources.
Within the Activity Monitor Window, we can access each and every detail of applications and the process, such as the number of threads, amount of Memory used, and more.
Memory Tab
Under the Memory Tab, you can access how much memory is used by each process. Besides, you can also access the memory Pressure, Physical memory data, Memory used cached files, and swap used.
App Memory Section
In the App Memory section, you can access how much Memory each App and process takes up. Wired Memory is the Memory reserved for Applications, and that cannot be fed up. Compressed is the inactive Memory. And that could be used by other applications.
All of the above described is sum up and displayed in the Memory used section. The Cached files are the unassigned Memory that is still available to you. The Swap Memory is the Memory used by your operating system, and it is already included in the Memory used.
Memory Pressure Tab
At the Memory Pressure Tab, you can see view how much pressure your system is undergoing. If you have enough Memory, then the graph will be in green. If you are in short of Memory, the graph will be in yellow, and it will be in the red when your system is running out of Memory. With the help of the graph, you can understand a lot.
Tips to use Activity Monitor to free up RAM:
Open Activity Monitor using Spotlight Search Bar.
Click on the Memory Tab.
Click on the memory column to find which application or process is hogging the RAM.
Identify the culprit. Select the App and click on the Information details in the menu. After going through the details, if you wish to quit the App, just click Quit, and the system will ask you to select any of the options Quit, Force Quit, or Cancel.
Select Force Quit if the App is frozen. And the application will be terminated. Besides, alternatively, you can close any process quickly in the activity monitor window itself. Select the App, and clicking on the X will forcibly terminate the process.
-
Check CPU Usage:
Sometimes apart from RAM hogging, some apps might be using a lot of processor space, which may affect the system. Further, they may slow down the system. For that, we need to check CPU usage in Activity Monitor in the following way.
- Open Activity Monitor
- Select and Click on the CPU Tab
- Sort the processes by % of CPU by clicking on the column header
- View and check for any abnormal usage by any of the processes or the App
- If found, Quit the App or Process by click on the X in the menu
Sometimes Kernel tasks running in the background may utilize more resources. In that case, you cannot terminate that process since the kernel process is related to the operating system process. To terminate the kernel process, you need to restart Mac.
Close Suspected Memory Consuming Applications in the following way. Right Click on the App icon in the Dock and click on Quit.
Other Options:
Sometimes, sending anything to print may be in the queue, and it may hang up your Mac. So check for it and do the needful.
If you are an expert or advanced user, you can open the terminal, type “sudo purge,” and hit enter after entering the password, and wait for a while to clear inactive Memory.
-
How to Minimize RAM usage in Mac:
If your Mac has less memory, you need to do the following few things to maximize the available resource.
-
Organize your Desktop:
If your desktop is cluttered with plenty of documents, images, screenshots, and folders, then it is time to organize them. If you prefer to keep them on the desktop, then keep them in a folder. macOS treat every icon on your desktop as an active window. Therefore if you litter your desktop, then more memory will be used by your desktop icons. So you need to periodically clear up your desktop to minimize RAM usage in Mac.
-
Organize Your Finder:
When you open the Finder window, if you see the most recent, then it needs to be changed as all the information about the location of the files shown will take space in the RAM
-
Change the Finder Settings:
By following the instructions, you can change the Finder Settings.
- Open Finder
- Click on Preference
- Under General, choose a folder to show when you open a new Finder Window
- Once you changed the Destination, you need to Relaunch the Finder by right-clicking on the Finder icon in the Dock by holding the Option/Alt button and selecting Relaunch.
Each Finder window utilizes RAM considerably. Therefore you need to close the finder window that is not what you are using or merge all finder windows altogether.
-
Stop Applications Starting Up Automatically:
When you start your Mac, the apps in the startup menu will open automatically and running in the background, and use up the resources. But you can easily disable some apps in the startup menu by following these steps:
- Open System Preference.
- Click on the Users and Groups.
- Select Your Username on the left sidebar.
- Click on Login Items.
Here you can view the startup applications.
You can disable unwanted apps by selecting an App in the list and clicking (-) and Exit.
-
Close the Web Browser Tabs:
You can see the websites opened in Safari listed as separate processes in Activity Monitor. Therefore it is easy for you to close the website that hogs your system memory. Avoid opening multiple tabs open at a time.
If not needed, it is essential to close the browser; else, you close the extra open tabs. There are many pinned tabs in Safari that hogs your system memory, so check for them in the Activity Monitor and close them if not needed. You need to check your browser extensions. Sometimes they may be the reason for consuming more RAM.
-
Virtual Memory:
If you are running out of RAM, your Mac drive can be used as virtual memory. So free up some storage space if you are running out of RAM. Most of the experts recommend us to allocate 20% of your drive space free.
-
Third-Party Apps to clear RAM of Mac:
Generally, macOS is capable of managing Memory more efficiently. It deals with longs and crashes. Therefore there is no need for any third-party apps. But some third-party apps are available to optimize your RAM. If your Mac doesn’t have sufficient RAM, then you may go with some third-party apps. There are some apps such as Parallels Toolbox, CleanMyMac X, Memory Clean 2; you can try.
How to Clear RAM on Android:
With every new Android, the update brings a vast number of new features to Android phones. With every new feature added, it needs more memory to run smoothly. For that reason, only the new android Smartphones are powered with higher RAM.
If you have older versions with lesser Memory, you need to optimize your Smartphone’s RAM for practical use. Here we are going to discuss a few best ways to clear RAM on Android.
-
Check Memory Usage and Kill Unwanted Apps:
Some apps may consume more memory of your Android phone. Therefore frequently, you need to check the pattern of memory usage. For that, go to Settings -> Memory, which will display the memory usage recently. To check the Memory used by individual apps, tap on the Memory used by Apps in the Memory section. With the help of the three-dot button on the top right-hand side, you can sort them in order. With the help of the details, you can force stop the Memory consuming App.
Some apps run in the background even after you have closed. Besides, some apps run in the background from startup.
Go to the settings and further move on to the application manager. The application manager will display all the applications on your phone. You can few them. If you can see that the force stop button is clickable for any of the applications, it means it is running in the background. And you can force stop it. But unfortunately, it is a temporary solution.
If you wish to get a permanent solution for your problems, then go to settings -> Apps.
All the apps will be displayed, and you select the App you need to disable and tap on the Disable button. And that App is permanently disabled.
If you disable an App permanently, then it will not be allowed to send push notifications. Further, it will not receive updates, and hence you need to update it manually.
-
Do Not Use Too Many Widgets and Live Wall Paper:
The widgets are nothing but mini-applications and that pinned with your home screen. It allows the user to have instant access to it. Each pinned widget will keep running to provide you instant access even if your phone is idle.
Therefore the Widgets use a considerable amount of temporary memory, and the battery will drain faster. You can easily remove it from the home screen by tapping and holding it for a while. The live wallpapers may look very cool, but they consume more RAM. Therefore you should avoid using live wallpapers.
-
Eliminate Barely Used Apps:
You may have plenty of apps on your Android phone, but you have never used them. Even though you have not used it, they consume a lot of storage space and Memory. Therefore you need to remove the barely or unused applications from your Smartphone.
-
Remove Bloatware:
Some apps are included by default, and there are un-installable apps that eat up your device memory. Since you cannot delete them, therefore you need to disable them. Most of those system apps won’t show on the App List. Go to settings -> Apps and move on the App, which consumes a lot of Memory, and disable it.
Please note that the system apps are there for a specific purpose. Sometimes disabling them will result in inconsistent performance. Therefore you need to take at most care before removing that bloatware from Android.
-
Disable Animation and Transitions:
The Animation and transitions on Android make it look more elegant and intelligent. But they strain the Memory to some extent. Therefore you need to disable it for sure. Now it is effortless to do so. Firstly, you unlock the Developer Option and scroll down to Windows animation scale, Transition animation scale, or Animator durations scale. Whatever it may be, turn them off.
-
Use Third-Party Booster Apps:
Some third-party booster apps are available to clean up your device’s RAM for better performance. They not only clean your device’s memory but also optimize it for better performance.
For better performance, you need to follow the following tips:
- Restart your phone periodically
- Reduce stress on the Memory
- Manage Apps to keep your device run smoothly
- Clear the cache periodically
- Uninstall any app you do not use
- Go to Developer Mode and limit the background process to get a good boost in performance.
- With your responsibility, you can make a swap partition to speed up your Memory.
- Even you can try Stock Android Version (Android with no apps installed)
- Some Firewall Apps protects you from data consumption.
Here we have discussed some best ways to free RAM on Android. You would be easily managing them. Use only trusted programs.
How to Clear RAM on iPhone:
With few clicks, you can reset your iPhone Ram to make it perform faster. It is one of the best ways to make your apple phone faster with a few clicks. If you clear the memory of your iPhone, you cannot observe any changes in the display. But you will feel the difference while using your iPhone.
Clear RAM on iPhone 7 & Older Models:
- Hold down the Sleep or Wake button.
- Slide to Power Off appears Now Move on to Sleep/ Wake button.
- Hold Down your Home button.
After some time, your screen will go blank, and then it will return to the Home screen. Now your iPhone RAM is cleared. While doing so, better turn off Siri and, after completing the entire job, again turn on Siri. You can instantly feel the difference in the speed of your iPhone.
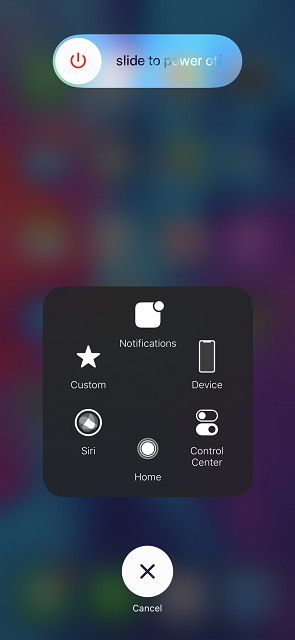
How to Clear Ram in iPhone X, XS, XR Models:
- Enable Assistive Touch.
- Go to settings ->General -> Accessibility -> Assistive Touch and Enable Assistive Touch.
- Now Go To Settings App.
- Select General.
- Scroll down and select Shut down.
- Power Off screen will ask you to slide to power off or cancel.
- Now Tap on Assistive Touch and then Press and Hold the on-screen Home Button.
- The iPhone will flash and return to the Home Screen.
Now you have cleared your iPhone memory, and your phone is ready to use.