In excel, there are a few basic tasks that you need to do regularly. Some people prefer to do their routine tasks in excel. For example, they write some specific formulas, copy and paste some data, update some columns, write a text a few times at several sheet locations, etc. These methods are very time-consuming. That’s why to save time; Macros are very useful. This tool helps to automate tasks, decrease errors, save time, and so on.
With the help of this program, you can even copy keystrokes or mouse actions. Sometimes, you need to do tasks in excel for a repeated time. In this case, for automating those tasks, you can record a macro. You can run the set of actions many times as per your need. Remember, while making a macro, it will record the mouse clicks and keystrokes. As soon as you have done this macro-making process, it will allow you to edit it.
Therefore, you can make small changes. For instance, you are an employee who needs to make a report for the accounting manager. Here, you have to apply bold and red formatting to those client names who have overdue accounts. In this case, you can create a macro that will enable you to make the necessary formatting changes to the selected cells.
What is an Excel Macro?
It is a record and playback tool. The tool allows you to record the excel steps. You can use it as many times as you need. It saves your time by automating your repetitive tasks. It is part of programming code used in an Excel environment. But, for programming this, you don’t need to take the help of any coder. However, you should have the basic VBA knowledge for creating advanced modifications in this tool.
Why are Macros Used in Excel?
In a layman’s language, we can define it as recording your daily steps in excel. Therefore, you only need to replay it using a single button. Suppose you are a cashier in a water utility company. Some customers can pay through the bank. Then, your job is to download that information from the bank at the end of the day. After that, you have to format these in such a way so that they can fulfill the business requirements. If you want, you can import the information into Excel. Then, you can format it. Every day, you need to follow the same process of downloading and formatting the data. It may feel tedious. In this case, automating the routine tasks using macro can make your job done.
What is VBA in a Layman’s Language?
It refers to Visual Basic for Applications. Excel takes the help of this programming language for recording your routine task’s steps. The best thing is you can use it quickly, and you don’t even need to be a programmer or a very technical person. The built-in features of excel can automatically create the source code.
Excel Macro Basics:
It is one of the features used for development. However, it cannot be seen in excel by default. You can use this to compromise your system from attackers. In excel, these are available in disable mode usually. However, if you want to run the tool, then enable the running ones. You should run only those macros which come from a trusted source. For saving it, you have to keep the Workbook in a macro-enabled format .xlsm. While giving it a name, make sure that there remains no space. You should always fill in the description while generating this. Thus, you and other people can understand for which purpose this tool is using.
Step by Step process of Recording Macros in Excel:
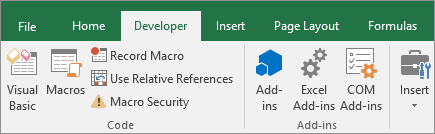
Here, we have given an elaborate procedure to let you know how to make it in Excel. We need to make a macro-enabled template. It will help to import data and format it to fulfill the business reporting requirements. If you want to execute a VBA program, you must have access to the developer option. To get access, you have to enable the developer option. Then, you need to pin it into the prime Ribbon.
Steps:
- You have to go to “FILE,” which is the main menu. Then, you have to choose “Options.”
- Now, you can see that another window is appearing. Here, you need to tap on the Customize Ribbon. Then, your job is to mark the checker box. Next, hit the OK button.
- The developer tab will be available in the Ribbon.
- Here, you need to download the CSV file. Here, we have given the procedure to let you know how to create a command button on the spreadsheet and how you need to execute the program. Let’s check it out.
First, you have to make a folder in your C drive named Bank Receipts. After that, you need to paste your downloaded receipts.csv file.
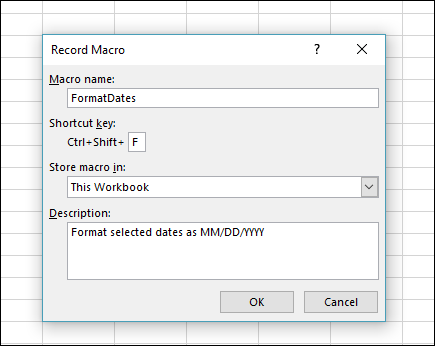
- If you want to record a macro, tap on the developer tab first. Then, hit the Record Macro button. As soon as you do this, you get to see a dialogue window. Then, your job is to put the name of your macro. To name this, you have to enter ImportBankReceipts. Then, you have to tap on the description option. After that, your task is to hit the “OK” tab.
Further Steps:
- Now, you need to follow those tasks which are essential for recording. First, you need to take the cursor to cell A1. Then, you have to tap on the DATA tab. After that, hit the From Text button that is available on the Get External data ribbon bar. Here, you can see the dialogue window. Now, you have to open the local drive folder.
Here, all the CSV files are available. Then, you need to choose the CSV file you want. Tap on the Import button, and then you can see the wizard. As soon as you have completed all the steps given above, tap on the Next button. Then, you need to hit the Finish button.
- In this step, you need to format the data. Then, your job is to bold the columns and calculate the sum of the total. After that, you have to use the SUM function for adding all the amounts at a time.
- When you have completed your routine work, you need to tap on the stop recording macro button.
- Make sure that you have deleted the imported data before saving your Workbook. It will help you to make a template from which you can copy and create new receipts. To do this, first, you need to highlight the imported data. Then, you have to tap on the highlighted data. After that, you have to tap on the Delete option. Next, tap on the Save option. You need to save your Workbook in a macro-enabled format.
Saving the Macros:
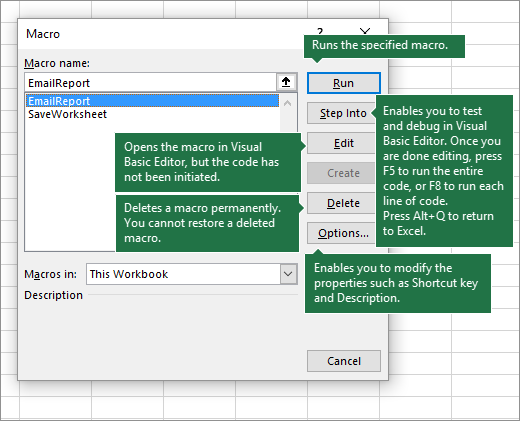
If you want to create a copy of a newly saved template, open the format. Then, tap on the developer tab. After that, you have to hit the Macros button. When a dialogue window appears, choose the ImportBankReceipts option. Then, highlight the description of the macro. And, you have to tap on the Run button. Later, you will get the information. Thus, you can create a macro in Excel.
How to Create It in Windows:
- Before recording
You can get both Macros and VBA tools available in the Developer tab. However, the tab is hidden by default. That’s why the first task you need to perform is to enable it.
- Record a macro
Here, you need to tap on the record macro option. Then, you need to name the macro. After that, you have to enter a shortcut key in the shortcut key box. Then, you need to add the description. Then tap on the OK button to start recording.
- Take a closer look at this
While editing it, you will get to know about the Visual Basic programming language. If you want to edit it on the Developer tab, tap on the Macros option. Then, you need to choose the name of this macro. And after that, you need to tap on the Edit option.
How to Create It in macOS:
Before recording, you need to confirm that you can see the Developer tab on the Ribbon. Remember that the tab will not be visible by default. You need to go to Excel first. Then, you have to go to Preferences and then Ribbon & Toolbar.
Choose the developer check box in the Customize the Ribbon category that you can find in in the Main Tabs list.
After that, you have to tap on the Save option.
Now, follow the above methods for windows.
How to Run a Macro in Excel:
As soon as you save the tool, you can run it in many ways.
First of all, your job is to run the tool from the Ribbon. You can see a button labeled Macros in the view tab and the developer tab. Tap on the button if you want to see these.
You can choose any of the saved macros from the resulting windows. To do this, select the macro and then tap on the Run option.
Excel will repeat all the steps that you have done while recording. Now, you need to check whether it is working or not. To do this, you have to unbold and delete cells E2 and E3. Then, you need to sort the names given here alphabetically.
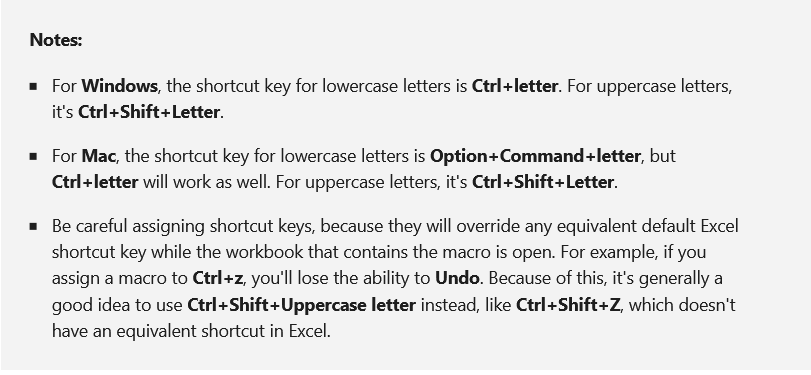
You will get a similar result while running it. Have you designated any shortcut keys while saving the tool? If yes, then you can run it in this way. Just tap on the Ctrl button. Along with this, hit the key which you have put in the save box.
In case you need to add a shortcut key later, then go to the option View Macros. After that, you need to choose the option and then tap on the Options. Thus, you can easily designate the latest shortcut key.
Sometimes, you may have a complicated macro, or you need to share the spreadsheet with others. In this case, you have to make a button on the spreadsheet that can run the macro.
Steps:
Here, we have given the procedure to do. Follow them properly.
To do so, first, you have to make a shape. For instance, you can use a rectangle with rounded corners.
Then, you need to put text inside the shape. It refers to its working process. Just right-click and choose the Edit Text option.
After that, you need to tap on the shape and then choose the Assign Macro option.
Next, you can choose the corresponding macro that is available in the resulting window. Then, hit the OK button.
Now, you only need to tap on the shape. Excel can run this recorded macro whenever you want.
Thus, you can run it from the Quick Access Toolbar.
Here, you have to include the View Macros button in the Quick Access Toolbar.
For this, you need to go to the File option, then tap on the Options. After that, you can choose the Quick Access Toolbar, which you can get in the left pane.
Now, go to the bottom part of the list. After that, you need to select the View Macros option. Then, tap on the Add option for adding it to the Quick Access Toolbar.
Now, you have to hit the OK button.
You need to tap on the macros button while you want to run it. The button is available at the top of the Excel window.
Automate Excel Without Macros:
These macros have only one drawback. It is that you can’t run this in the Excel Web App or on a mobile device. These can work excellently when the data is already in the spreadsheet. However, it is difficult to get new data into the spreadsheet from other apps.
App integration tool Zapier can be beneficial in this case. It helps Office 365 connect with numerous apps such as Stripe, Salesforce, Slack for Excel’s Business edition. As a result, you can log into the spreadsheet automatically. Besides, you can begin your task in other apps from excel quickly.
Here, we have discussed how it works. Suppose you want to save the data of Typeform form in an Excel spreadsheet. You only need to make a Zapier account and then tap on the ” Make a Zap” button. It is available at the top right corner. After that, you have to choose the Typeform that you can get in the app picker. Then, you have to fix it so that you can see your form for new entries.
Zapier Typeform:
The tool can see the form for new entries. You merely have to test the zap and then tap on the Continue option for adding an extra step to your Zap. Now, you have to choose the Excel app and select the option “Add a Row to our spreadsheet.” It also enables you to update a row. You can search for any particular row in your spreadsheet.
Add Row to Excel Sheet Spreadsheet:
With the help of Zapier, you can add, update, as well as search rows in the spreadsheet. Now, you have to select the spreadsheet and worksheet. Next, hit the “+” icon. It is available on the right side of each spreadsheet row. It helps you to choose the right form field that you will save to the spreadsheet row. Now, you need to save the Zapier integration and then test it. After that, you have to turn on this. The tool can save the data to the spreadsheet whenever the Typeform form gets filled out completely.
Example of Excel Macros:
Here, we have given a few examples of it.
Example: Write a Program to get Text Hello
Here, we have given a small program in VBA. The prime motive of this program is to get the text Hello, “your name.” You can get in the message box each time you enter a name there.
After that, you need to open the sheet. Next, your job is to open the developer’s tab, which is available in the Ribbon. After that, you have to press Alt+F11. As soon as you go to that page, you can tap on the Insert option. Then, it would be best if you tapped on the module option. You need to write the first program in Module 1. When you begin your program, you need to follow some rules. For example, you have to start it with “Sub” and end with End Sub.
Sub hello_word ()
Dim name As String
name= InputBox (“Input your name”)
MsgBox “Hello” + name
End Sub
The “Dim name as a string” refers to the name of a string. You can see there an inbuilt Inputbox function. It asks you to enter a name in it, and the name will be stored in a variable name.
Now, you can see the name in the Msgbox. After that, you need to generate a command button. To do this, you only need to go to the Developer tab. Next, you have to insert the tab. After that, your job is to form a control and command button.
Then, you have to assign it to the button. Next, you need to tap on the OK key.
As soon as you tap on Button 1, you can see the name on the screen.
Every time you will press button 1, you will get to see the input box. In this case, you only need to put down the name. After that, you can see “hello+name.”
However, users can run the code from the VBA window. In this case, you just need to tap on the F5 button. Do it if you still haven’t made the command button.
Things to Remember:
You should save the macro containing the file as an Excel Macro enabled template like the file type. Otherwise, you will be unable to save these.
There should not be any space in the name of the macro.
You need to write programs in modules.
You have to be very careful while recording. It is because if you repeat any step, it will get recorded. As a result, it won’t give the correct output.
Using the Code from Excel Macro Examples:
These are the following steps that you have to follow for using the code.
First, you need to go to the Workbook, where you will use the tool. Then, open it.
After that, you have to hold the ALT key and then tap on the F11 button. As soon as you click on it, the VB editor will open.
Next, you have to tap on any of the objects which are available in the project explorer.
Then, you need to go to the Insert option and then the module.
After that, your job is to copy the code and paste it into the Module Code Window.
If you have to paste it in the worksheet code window, then you need to tap two times on the worksheet object. After that, follow the copy & paste method in the code window.
As soon as you insert the code in a workbook, save the code with a.XLSM or. XLS extension.
How to Name Excel VBA Macros:
If you are going to name it, try to give it a unique name. It should not be similar to the others. Besides, make sure that the name should not be the same as the name of other properties, functions, and tools within Excel.
If you want to give a macro name, you need to type Sub name(). Then, hit the “enter” button in the coding window of the editor. As soon as you tap on the enter button, it will fill the window automatically. It follows the general format of an Excel macro.
For instance, if you want to name it “CFI Macro,” you need to type “Sub cfiMacro().” Next, hit the enter button. Using the VBA Editor, you can include an “End Sub” line. These lines are just under the “Sub.”
Sub Name in VBA:
This Sub Name() indicates the beginning of the code. Besides, the End Sub command refers to the end of the program. Whether you want to make a second new macro, you need to start a new Sub Name() line under the first End Sub. When you try this, you can find that excel is making a line between the two different macros.
Sub cfiMacro ()
End Sub
________________
Sub cfiMacroTwo ()
End Sub
It is the basic structure of macro.
Unhide the Personal Workbook:
When you are going to edit it, it is essential to know where it is saved. If you have this already in your Workbook, you have to unhide it. You can get all the universal macros in the personal Workbook. Whenever you open Excel, it opens.
However, it is not visible as it is hidden by default. Therefore, you will not be able to know whether it is there or not unless you unhide it. When you are going to edit any macro, you have to unhide the Personal Workbook.
You need to tap on the View tab.
Then, you have to hit the Unhide Window button.
You need to make sure that you have chosen the PERSONAL option. Then, tap on the OK option.
Now, this Workbook will appear in another window. The Workbook needs to be visible for editing. The macros allow you to edit any open file.
As soon as you have done the editing process of the personal Workbook, you have to hide the Workbook once again.
Edit a Macro:
To display the Visual Basic Editor:
Tap on the Visual Basic button, which is available in the Code group on the Developer tab.
To Edit A Macro:
You need to display the editor first.
Then, you have to select the Macros from the Tools menu.
Now, go to the Macros dialog box. Choose the project you want to edit from the Macros in the drop-down list.
As soon as you see the Macro Name list box, choose the macro you want.
Then, hit the Edit option.
When you see the Code window, you can edit it as you prefer.
After that, you have to shut down the Macros dialog box.
To close the Visual Basic Editor, you need to select the Close option. It is available in the File menu. Then, you need to go back to Microsoft Excel.
Delete a Macro:
If you don’t need the macro anymore, then remove this. When you remove the unnecessary macros, it will become easier for you to see them in the Code window, Visual Basic Editor, and in the Macro dialog box.
Use the Macro dialog box or the Visual Basic Editor to remove or delete it in an open workbook. You need to unhide the personal Workbook when you remove any macro using the Macro dialog box. When you use the Visual Basic Editor for deleting any macro from any open workbook or Personal Macro workbook, you don’t need to unhide it.
Macro Dialog Box Method:
First, you need to find the Code group in the Developer tab on the Ribbon.
Then, you have to tap on the Macros button on the developer tab in the code group.
Now, choose the macro you want to remove from the Macro dialog box. It is available in the Macro Name list box.
After that, you have to tap on the Delete option.
Then, you have to select the Yes option in the message box.
Visual Basic Editor Method:
This process is similar to the previous one.
First, you need to locate the code group in the developer tab. After that, click on the Visual Basic button. Next, you need to choose Macros from the Tools. Now, from the drop-down list, you need to select the macro that you need to delete. After that, click on the delete option.
After deleting it, you need to select the Close button. Then, go back to Microsoft Excel.
Test an Edited Macro:
After editing the Visual Basic code, you should run the macro again. To do so, tap on the Macros button on the Developer tab. Then, choose the edited tool and hit the Run button.
Tools For Creating Excel Macros:
Excel enables you to make macros using these two tools— the Macro recorder and the Visual Basic Editor.
The Macro Recorder enables you to record the actions. On the other hand, while using the Visual Basic Editor, you have to write the instructions that Excel needs to follow.
Assigning to Both Ribbon as Well as Quick Access Toolbar:
To run the macro, you can assign it to the custom tab on a custom button on the Quick Access toolbar or a custom tab on the Ribbon rather than choosing it in the dialog box. However, if you follow this process, you don’t need to run the macros by pressing shortcut keys. After assigning it, you need to tap on the custom button.
If you want to assign an Excel macro on a custom Ribbon tab, follow these methods.
First, you need to tap on the file. Then, go to the Options and tap on the Customize Ribbon tab. It is available in the Excel Options dialog box. Pressing Alt+FTC at a time can also make your job done. You can see the Customize Ribbon pane in the Options dialog box.
Then, you have to tap on the Macros. Next, your job is to select the Commands. It is available in the drop-down list box on the left. You can get the list of all the macros in Excel.
These are available in the current Workbook. You need to select commands from the list box and then save it in the PERSONAL.XLSB workbook.
You need to tap on the custom group name, which is available on the custom tab. Click on that one where you need to add the macro in the Main Tabs list box. Have you not still made a custom tab and group for it? Do you want to create a new one? Then, you can follow the steps.
First, hit the New Tab button. You can get it available at the bottom of the Main Tabs list.
Microsoft Excel can include both a New Tab (Custom) and New Group (Custom) item. It adds these to the Main Tabs list. Besides, it can choose the New Group (Custom) item.
After that, you have to add the New Tab (Custom) item, which is included in the Main Tabs recently.
Now, tap on the Rename button, which is available at the bottom of the Main Tabs list box. After that, you have to enter a display name for your latest custom tab. Then you need to tap on the OK button.
You have to hit the New Group (Custom) item now. It is under the custom tab that you have just renamed.
Now, hit the Rename button and write a name for your new custom group. Next, you need to click on the OK button.
After that, your job is to tap on the macro name available in the Choose Commands. After selecting the macro that you wish to add to the custom group, you need to choose the Main Tabs list box open on the right.
At last, you have to tap on the Add button for adding your chosen Excel macro to the selected custom group on the custom tab. If you rename this or assign this to a new icon, you must tap on the Rename button. Then, you have to make the necessary changes in the Rename dialog box. Then click on the OK button. Next, you need to close the excel options dialog box. When you add this to the custom group of a custom tab, you can see the macro appearing on a button. This button will be available on the custom tab of the Ribbon. You need to then tap on the command button to run the macro.
For Assigning It To A Custom Button On The Quick Access Toolbar:
Follow the steps to assign it to a custom button.
You have to tap on the Customize Quick Access Toolbar button. It is available at the end of the Quick Access toolbar. Then, you have to tap on the More Commands. It is available on the drop-down menu. Then excel will open the dialog box using the Quick Access Toolbar tab.
Here, you also need to tap on the Macros option first. Then, you have to select the Choose Commands that you can get from the drop-down list box. Choose from the list available in excel. These are available in the recent Excel workbook and the PERSONAL.XLSB workbook.
Tap on the name of the macro for adding this to a custom button. It is available on the Quick Access toolbar to get in the Choose Commands From list box. Next, hit the Add button.
Then, you have to hit the Modify button to open the Modify Button dialog box. Do it only if you need to make any changes in the display name. Next, your job is to assign a separate icon to the macro button.
Tap on the OK button for closing the Excel Options dialog box.
As soon as you shut down the Excel Options dialog box, you can see a custom button appearing on the Quick Access toolbar. If you want to know the macro’s name assigned to the custom macro button, you have to point the mouse over the button. Then, could you tap on the button to run it?
Setting Up Excel:
Before you face any problem using the code, you need to confirm that you have done the setup process of excel appropriately. For example, you need to check whether you have done the appropriate macro security. Moreover, you need to confirm that you have enabled security settings.
Security Settings:
You can use macros for several purposes, such as installing a virus, record keystrokes, and so on. The proper security settings help you to block this job. However, make sure that you have not set it too high. Otherwise, you will be unable to run it. If it is too low, then you will be unable to protect it.

Here, we have given the suitable settings that you can apply. These settings will let you know when you need to allow the macros or not.
First, go to the File option and then tap on the Options.
Then, you can see the Trust Centre option in the Excel Options dialog box. Tap on it. After that, you have to tap on the Trust Centre Settings option and then Excel Options.
Next, hit the Macro settings that are available in the Trust Centre dialog box.
Tap on the Macro Settings option. Thus, you can disable all the macros along with the notification.
After that, you have to hit the OK button for closing the Trust Centre. Next, tap on the OK button again to close the Options.
Now, all the macros in workbooks will get disabled automatically. The process will be continuing until you tap on the Enable Content button that is available at the top of the screen.
Conclusion:
It is such a tool that can be used for reducing hours in sorting data. The tool is quick, innovative as well as efficient. It helps to make your regular jobs done quickly.
Frequently Asked Questions:
- Can you use VBA macros in the online version of Excel?
No, it doesn’t allow you to edit, run, or add VBA macros in the online version. However, it enables you to open and edit a workbook that comes with VBA macros.
- Is there any replacement for VBA macros for running it in online Excel?
With the use of HTML, CSS, and JavaScript, you can make new Excel Add-ins. You can use these add-ins across many platforms like Windows, Mac, iPad, and web browsers.