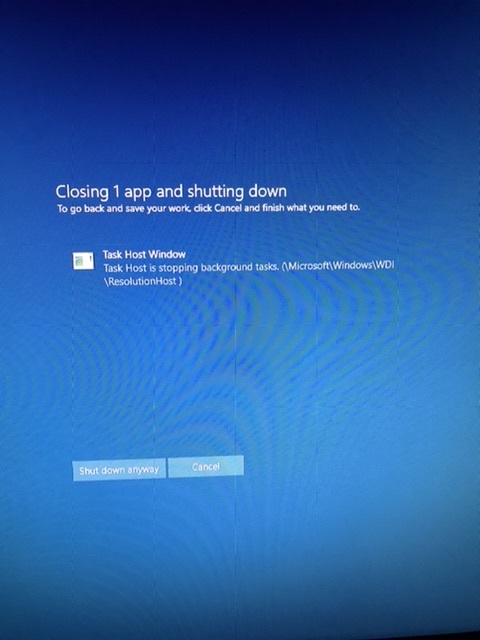
Wanna close your system, but are you unable to do that? It can happen in case you don’t shut down any program. In this case, you will see an operating system popping up a window that asks you to shut down the program or shut down anyway. You can do any of these two options. However, you may find any specific internal process stopping the process of shutting your system. Then, you generally get this message: Task Host Window, Task Host is stopping background tasks. You will see the Task Host Window Prevents Shut Down error message generally while an update file stops the computer from updating.
You should know about the Task Host is a Windows program. It is not malware or a virus. Therefore, there is no risk of your PC being damaged. While you are going to close the PC, it makes you sure that you have closed all running programs properly. It will help you to avoid data and program corruption. You can take a notepad file or a word file as an example. When you are going to close them, you get to see this window appearing. You should hence shut down all the running programs to secure your system. Make sure that you have closed all running programs before closing the computer.
However, if you shut down your PC without shutting down a program, it doesn’t cause any problem. Whether you work on a draft in Word or a spreadsheet in Excel, it is better to return and save the work you have done before closing the PC. It is because if you don’t save your work, it may cause data loss.
If you find no running programs that prevent you from shutting down your PC, then follow the process given in the article.
What is a Task Host Window?
Task Host Window is one of the programs running in the background of your system. This program helps to keep the PC protected from unwanted shutdowns. Therefore, while you are going to close the PC, it generally appears on display. You can see this appearing sometimes while rebooting the PC.
How Does Task Host Window Work?
While you are going to close your PC or shut down, this window appears then and interrupts the shutdown or reboot process. This time, it checks whether any program is running or not. To prevent data loss, you are required to do this. You can see a pop-up letting you know the programs running on your computer. Therefore, you can return to the display and close them if any program is running.
As per Microsoft customer service, it is essential to shut down all programs before closing or rebooting your Windows-based computer. This one is not a bug.
Sometimes, it can prevent background tasks. If it is the case, then your job is to shut down a few programs. You get to see a message popping up while an update file is ready. But your system stops your PC from updating the file somehow.
How to Fix Task Host Window Prevents Shut Down Issue in Windows 7:
If you are using Windows 7, then you can use the Registry editor. Performing a clean boot can be helpful also. We have given these two processes in the section of windows 10. Check them out to apply.
Use Windows Hotfix:
Microsoft knows about the Task Host Window Prevents Shut Down in Windows issue, and that’s why they released Hotfix for it. If you need this, you can download it. After downloading, your job is to go through the prompts on the Microsoft site. Do this when you get the HF through the mail. Open the tool to run by following the steps given on display. When you perform the method, your job is to reboot the PC and test it.
Fix for Task Host Window Prevents Shut Down Issue in Windows 8/10:
Here are the methods to resolve the Task Host Window Prevents Shut Down in Windows:
- Repair Corrupt System Files
- Power off Hybrid Shutdown or Fast startup
- Edit WaitToKillServiceTimeout through Registry Editor
- Modifying Account Settings
- Installing the Delayed Update
- Running a Windows Defender Offline Scan
- Restart InstallService Service
- Shut Down All Apps And Wait For A While Before Closing The PC
- Start System in Safe Mode
- Perform a Clean Boot
- Perform sfc and DISM scan
- Disable All Internet Explorer Add Ons
- Disconnect the Computer from the Network
- Upgrade Your RAM
- Use CCleaner
- Turn Off Your Sound Scheme
- Disable RacTask
- Make a New User Account
- Change the Priority of the Applicationframehost.exe
- Power Off OneDrive Synchronization
Check all the methods and try them one by one if you have windows 8 or 10 versions.
Repair Corrupt System Files:
You can repair the system files that get corrupted. For this, your task is to download the Restoro app and run it for scanning the corrupt/missing files. In case the tool finds the files corrupt and missing, it repairs all of them. After that, it will check whether the error still exists or not. If it doesn’t fix the issue, you can move to the following process.
Power off Hybrid Shutdown or Fast Startup:
If you are using Windows 8 or 10, you find the Hybrid Shutdown and the Fast Startup feature causing the error. These are designed so that your system will perform quickly. When you enable the feature, it stops the running programs at the existing state and doesn’t close them. Therefore, while your system resumes its operations, you are not required to re-initiate the programs. Rather than that, you merely have to restore the method and continue it from where it stopped. Following the technology, MS can increase speed. But we don’t have any idea why they are not fixing the error.
The process lets you know how you should disable the use of Hybrid Shutdown or Fast Startup.
- First, your task is to hold the Windows button and then tap on the R key. Now, you are required to write powercfg.cpl in the Run dialog. Then, tap on the OK button.
- You should then tap on the Choose option that the Power key does from the left pane.
- After that, your task is to select the option Change settings, which you don’t get recently. Hit the Yes key when you see the User Account Control warning appearing.
- Navigate to the Shutdown settings section, and then it is recommended to remove the check beside the Turn on fast startup to disable it.
- Next, your job is to hit the Save changes key. Restart the PC after that and then test to check whether the problem still exists or not. If not, then you should move to the next step.
Edit WaitToKillServiceTimeout through Registry Editor:
WaitToKillServiceTimeout lets you know the time long the system can wait for services. You are capable of using the entry merely while you apply a shutdown command tapping the Shut Down.
- To do this, your first task is to hold the Windows button. Then, tap on the R key. After that, your job is to write Regedit and then tap on the OK key. Now, you should go to the following path:
HKEY_LOCAL_MACHINE -> SYSTEM -> CurrentControlSet -> Control
- When you move to the Right Pane, your task is to tap two times on the WaitToKillServiceTimeout option. Now, your task is to change your Value to 2000. Tap on the OK key after that. You should know that the default value is 12000.
- Next, your job is to move to this path:
HKEY_CURRENT_USER -> Control Panel -> Desktop.
- After you highlighted the Desktop in the left pane, your job is to right-click in the empty area in the right pane. Now, you should select options New and then String Value, respectively. Give a name to the String Value as WaitToKillServiceTimeout.
- Next, your job is to tap the right button on WaitToKillServiceTimeout. After that, tap the Modify option. You need to write 2000 then under the Value data. Hit the OK button now.
- At last, your task is to get out of the Registry Editor and then restart your system. Finally, check whether your problem is fixed or not.
Modifying Account Settings:
People who have been affected due to the 1709 update should use this process. When this 1709 update became available in the market, multiple system functions started to conflict, and various issues arose.
- To get rid of the problem, your job is to tap on both Windows + S keys for launching the Search bar. Then, you navigate to the dialogue box and write “account” there. Next, you have to open the very first result you get to see.
- As soon as you are in the account settings, you should move to the “Sign-in options” option. Then, your job is to turn off “Use my sign-in info to automatically finish setting up my device after an update or restart.”
- Finally, you should reboot the PC and check whether the problem still exists or not.
Installing the Delayed Update:
Users can see this error message “Task Host Windows is Preventing Shutdown” while your PC has an updated file but is unable to install. To get rid of the problem, you can take the help of the Windows Update Troubleshooter.
- In this case, you should hit the “Windows” + “I” buttons repeatedly and open the Settings option after that.
- Tap the option “Update & Security” now.
- After opening the options, tap on “Troubleshoot” available in the left pane. Then, your task is to choose “Windows Update” from the list.
- Now, hit the “Run the Troubleshooter” option.
- As soon as you do this, the troubleshooter will identify the error automatically. Then, you need to fix the issue.
- Hence, you should wait for a while until it is not installed. Finally, check if it is still there.
If necessary, you are capable of starting the troubleshooter from the Control Panel also. Follow the steps for performing the method.
- First, your job is to tap on the Windows Key + S together. Then, you should go to the control panel. After that, you have to choose the Control Panel option from the list of results.
- As soon as you open the Control Panel, go to the option Troubleshooting.
- Tap on the option View all in the left pane.
- You can see a list containing all available troubleshooters. Tap on the Power option after that.
- As soon as you open the troubleshooter window, tap on the Next option. Then, you are required to go through the instructions on display.
- According to many users, they have fixed the problem running the Power troubleshooter.
Running a Windows Defender Offline Scan:
If you are a windows user, you must get Windows Defender as a default Antivirus. The fast scanning capability of the tool makes it useful. Here, we let you know how you should use the Windows Defender to scan PCs for malware/viruses.
- To do this, first, tap the “Windows” + “I” buttons repeatedly to open the run prompt.
- Then, your job is to tap the “Update and Security” option. Next, your task is to tap “Windows Security” available in the left pane.
- Tap the option “Virus & Threat Protection” after that. Then, you have to choose the “Scan Options” key.
- Now, your task is to check out the option “Windows Defender Offline Scan.” After that, you should hit the “Scan Now” key to start the scan.
- Finally, you should check whether the problem still exists or not.
Restart InstallService Service:
- In this process, your first task is to navigate to the Windows Services Manager and open it.
- Then, your job is to scroll the page downwards and then right-click on the InstallService. Choose the option “Restart” now.
- Finally, you should restart the Windows PC.
Shut down all apps and wait for a while before closing the PC:
Multiple users reported that it appears while they don’t shut down all running apps. Hence, it is better to make sure that all apps remain appropriately closed.
You should wait for a while before closing the computer. Thus, you can stop all running programs. When these stop, you can close the computer without any issue.
However, you should know that the result can vary. In case you succeed using the solution, use this always while you are going to power off the computer.
Start System in Safe Mode:
Safe Mode is one of the effective parts you can run with default apps and drivers. Therefore, it is ideal for troubleshooting. If you are willing to check out any third-party app causing the error, you should go to the Safe Mode.
- First, your task is to navigate to the Start Menu and open it. Then, tap on the Power key and then the Shift button. Hold the shift button after a while. After that, your job is to tap the Restart option.
- Now, you should choose the Troubleshoot option and then select Advanced Options, Startup Settings, respectively. Hit the Restart key after that.
- After you start the computer, the Task Host window prevents the shutdown.
- As soon as the computer restarts, a list of options will appear in front of you. You are capable of choosing any version of Safe Mode. Just tap the corresponding key and select the version you prefer.
- When you go to Safe Mode, you should use this for a few moments. Try to run apps that you use generally. Then, you need to power off the computer.
- Whether the error remains, ensure that a third-party app is causing the problem.
Perform a Clean Boot:
Multiple users have solved the problem by performing this step. If you want to perform the process, you must disable all startup apps and third-party services.
You are capable of doing this following the steps.
- First, your job is to hit Windows Key + R key and then write msconfig. Tap on the Enter button, or you can hit the OK key.
- As soon as the System Configuration window appears, your job is to navigate to the Services tab. Then, you need to check to Hide all Microsoft services options and then tap on the Disable all option.
- Move to the Startup tab after that and then tap on the Open Task Manager.
- As soon as you open the Task Manager, a list of all startup apps appears. Choose the first app you can see on the list and then tap on it. Select the Disable option after that. You can do the step again for all entries on the list.
- Next, shut down the Task Manager and return to the System Configuration window. Tap on the Apply button and then hit the OK key to save changes.
- Finally, you should restart your computer to take effect.
Further Steps:
However, you can try this solution. As soon as you start your computer, you need to use this for a few moments. Then, you are required to power it off. Whether you find the issue, ensure that any of the disabled apps or services cause errors.
If you want to find, the apps creating problems, perform the steps again. After that, your job is to enable apps and services in groups or individually.
Always remember that you should restart the computer to apply changes after you enable services or apps. As soon as you find the apps causing problems, keep them disabled or delete them from the computer.
Perform SFC and DISM Scan:
Corrupt files are a reason for causing the problem. Whether you are willing to scan system files, you should run an SFC scan. Follow the steps to do this.
- First, you should hit both Windows Key + X buttons to open the Win + X menu. Then, your task is to select the option Command Prompt (Admin) from the menu. If the Command Prompt is unavailable on your PC, then take the help of PowerShell as administrator.
- As soon as you open the Command Prompt, type “sfc /scannow” there. Next, you should tap the Enter key to run the command.
- Doing this will start the scanning method. It can take about 15 minutes. So, you must keep patience and should not interrupt it.
Sometimes, the command stops working before the method ends. We have given a simple fix for you hence. As soon as you complete the sfc scanning, check whether the issue remains or not. In case you are unable to solve the error via SFC scan, try DISM scan.
DISM Scan:
- If you are willing to try a DISM scan, use Command Prompt as an administrator.
- Then, your job is to type these commands.
1. DISM /Online /Cleanup-Image /CheckHealth
2. DISM /Online /Cleanup-Image /ScanHealth
3. DISM /Online /Cleanup-Image /RestoreHealth
- Using a DISM scan may take some time to restore and repair the system. So, you must not disturb it.
- As soon as you complete scanning, see if the error remains.
Disable All Internet Explorer Add Ons:
As per the reports of the users, Internet Explorer add ons or toolbars may be the reason for the error. If you are willing to disable all add ons in Internet Explorer, follow the steps.
- First, your job is to navigate to Internet Explorer and open it.
- Then, tap on the Gear icon available in the top right corner. After that, you should select the option Manage add-ons.
- Now, you are required to choose Tools and Extensions available in the left pane. Choose the desired plug-in available in the right pane. Then, tap on the Delete or Disable option.
- As soon as you remove all extensions and add-ons from there, the problem should not exist.
Disconnect the Computer from the Network:
According to a few people, you can solve the error only by disconnecting the PC from the network. As per their reports and experiences, some apps must use the network bandwidth in the background. It may be the reason for which you are unable to close the computer.
If you want to solve the error, disable the Internet connection. You can unplug the Ethernet wire also before switching off the computer. If you find this helpful process, do this step again and again before closing the computer.
Upgrade Your RAM:
A few users said that the issue could appear for RAM also. They said they might present any data in your RAM while you are willing to close the PC. Generally, you won’t see RAM causing the problem. According to some users, they fix the problem when they are going to upgrade the RAM. So, you should try this solution once.
Use CCleaner:
The registry can be a reason for the issue. Sometimes, the registry may be corrupted, due to which you can face the problem appearing. The simplest way you can do this is to take help from CCleaner to clean your registry. You can solve the problem by cleaning the registry. So, it is better to use the CCleaner.
Turn Off Your Sound Scheme:
According to a few people, your system may play a shutdown sound, due to which you can encounter the error. That’s why it is recommended to disable your sound scheme to solve the issue.
The process is quite simple and can be done following these steps:
- First, tap the Windows Key + S and then type the sound. After that, you have to choose the Sound option from the list of results.
- Navigate to the Sounds tab after that and then choose No Sounds as Sound Scheme. Next, your job is to tap on the Apply option and then hit the OK button to save changes.
- When you save the changes, you need to close the computer. Then, check whether the error remains or not. Your sound scheme may be the reason for the error. However, according to some users, they can solve the error simply by changing their sound scheme.
Disable RacTask:
RacTask is a program set to start each hour. If you’re willing to solve the error, you should disable RacTask. Use Task Scheduler to make this job done. For disabling RacTask, you should do these steps:
- First, hit the Windows Key + S button and then write a task scheduler. After typing Task Scheduler, select it from the list available on display.
- Navigate to the Microsoft, Windows, and RAC respectively in the right pane as soon as it starts working. After that, your job is to find the RacTask and disable it.
When you have disabled that, you can finish Task Host from Task Manager. In this case, you are required to perform the steps.
- Hit Ctrl + Shift + Esc keys at a time for opening the Task Manager.
- As soon as the Task Manager appears in front of you, your job is to navigate the Details tab. Then, choose the taskhost option and then hit the End Task option.
- When you disable RacTask, the issue must not exist. Now, you can turn off the computer without any problems. In case you are unable to find RacTask for any reason, finish the Task Host process with the help of the Task Manager.
Make a New User Account:
Users reported that they were encountering the error due to the corrupted user account. If you are willing to get rid of the problem, make a new user account from scratch. Just follow these steps to perform.
- First, your job is to hit Windows Key + I for opening the Settings app.
- As soon as you open the Settings app, navigate to the Accounts section.
- Then, move to the Family & other people option available in the left pane. You are required to tap the Add someone else on the right side.
- Tap on the option after that ” I don’t have this person’s sign-in information.”
- Choose the option “Add a user” without taking the help of the Microsoft account.
- Now, you should put the name you prefer and then tap on the Next option.
- Finally, you may have a new account. You merely have to switch to the new account and then check if it exists. If not, switch to a new account entirely and use the new one rather than the old one.
Change the Priority of the Applicationframehost.exe:
You can face the error sometimes due to application priority. In this case, you merely have to change the priority of Applicationframehost.exe. Perform these steps to change it.
- First, navigate to the Task Manager and open it after that.
- After you open the Task Manager, your job is to navigate to the Details tab. You should then find the ApplicationFrameHost.exe and tap on it. Then, you should select the Set priority in High Mode from the menu.
- Shut down the Task Manager after doing this. Whether you find the process helpful, try the step each time before you close the computer.
Power Off OneDrive Synchronization:
If you are using windows 10, you will find OneDrive as default. It is a cloud storage service. The app helps to sync your files in the background.
When the files are syncing in the background, you can not switch off the computer. It can become a significant issue but can be solved by disabling file synchronization for OneDrive. After closing OneDrive, you should check whether the still error remains or not.
We hope these solutions will help you to solve the problem.
The bottom line:
We have given almost all methods possible to fix the problem in this article. Try each solution one by one to solve the error “Task Host window prevents shutdown on Windows.”
Frequently Asked Questions:
- Why is the Task host running in the background?
It happens while your system is having an updated file and preventing the computer. You should know that you cannot troubleshoot the problem as you can’t restart the system unless you close it forcefully.
- Is Taskhost exe a virus?
It is not malware or a virus. This one is an extension file that runs silently in the background.
- What is a background task host?
backgroundtaskhost.exe is one of the parts of the Cortana virtual assistant of Microsoft for Windows. Cortana is a virtual assistant that is useful when you use the computer. It works like Apple’s Siri. For instance, if you want, you may ask this virtual assistant about the weather. If necessary, you can ask the assistant to find files on the computer when you require.
- What does the Task host do?
Taskhost.exe is a type of method which can work as a host. It can run from dynamic-link libraries (dll) rather than exe.
- What is the task host window in a laptop?
It is an intelligent program that is popping up while you are trying to close your system.