Are you a casual gamer or a pro player who prefers streaming games on Twitch? These may be the reasons due to which you need to undervolt your GPU. The good news about the undervolting method is that this one is harmless. Multiple people are there who mess up the hardware during overclocking. But it is not going to happen for undervolting.
What is Undervolt GPU or CPU?
Undervolting or Dynamic Voltage Scaling is a power management technique. It is a method that helps to lower the operating voltage of the GPU or CPU. In most cases, manufacturers overclock graphics cards tend to ship with higher voltages. Mostly, the increased voltage is not essential. It can cause increased power consumption & temperature limits.
By Undervolting GPU, you can regulate the voltage limit and maintain a good temperature. When you apply the process to laptops & other mobile devices, it will help you to preserve the battery life and won’t cause an effect on device performance.
What is undervolt GPU?
Undervolting GPU is a procedure where the voltage to the processors and components of a PC is reduced on run-time dynamically. This one is a process within dynamic voltage scaling. It allows the conserving electric voltage to consume less power and enables the computing components to generate less heat.
As a user, you can undervolt merely those machines or devices that come with limited electrical supply and use batteries for power supply. For instance, mobile devices and laptops are devices you can use. The process is usually managed via software-based power management utilities. Generally, users can get these utilities available already in most of the operating systems.
This process helps to boost energy efficiency and allows devices to run for a long time on battery. However, the method has a few disadvantages also.
The lesser amount of voltage supplied results in caping on the processing power consumed.
In addition, if you undervolt a system more than its minimal voltage threshold, then it may cause system crashes.
Pros of UnderVolting:
The advantages of undervolting are:-
- The process generates less power and heat.
- Stops thermal throttling
- It usually boosts hardware lifespan.
- Besides, the method produces less noise.
- Preserves battery for those who use laptops.
- Consistently deliver improved performance.
Reason for Undervolt GPU:
GPUs are generally available next to the power supply, due to which it creates limited airflow. Undervolting GPU means that you are minimizing the produced heat from all the power-consuming hardware inside the PC.
Our aim is for less heat generation and power consumption, which benefits our system by reducing wear via limiting circular movement.
When your PC has a higher temperature, it consumes a lot of power, for which a lot of heat is produced. If you undervolt the GPU, it would help to decrease power consumption in the long run. Thus, by reducing the temperature from the inside of the system, you can help your system consume less power.
How Will Undervolt Provide Better Performance?
Video cards are one of the latest technologies used in recent times. Nvidia GPU usually features a GPU Boost. The function of this feature is to enable the GPU to overclock itself to provide improved performance. It happens only when the TDP allows, and the operating temperature is safe. When the temperature boosts, the GPU will reduce its core clock so that your system has a safe operating temperature.
But the issue is that the method is completed slowly, and there is no fixed temperature. It indicates that if a card reaches 80 degrees Celsius in a game, it will work worse compared to when it was at 70 degrees Celsius.
Therefore, when you purchase a new Nvidia GPU, try to buy a cool one.
Software Required for Undervolting:
All software is free to use. Therefore, you can use these for performing a stable undervolt on your Nvidia GPU.
3DMark Time Spy / Unigine Heaven / Unigine Superposition: This one is a benchmark that helps to stress GPU.
HWiNFO64: It helps measure sensor readings such as temperature, wattage, clock speed, etc.
GPU-Z: Its function is to find out the specifications of your GPU.
Google Sheets or Microsoft Excel: Google sheets are used to note down the information you will find.
MSI Afterburner: It is the device that you are going to use to undervolt the Nvidia GPU.
What does GPU Undervolting Do?
The function of GPU undervolting is to decrease the maximum load temperature. It is done by eliminating the total power consumption. The method reduces the current or voltage supply. Thus, it helps to lower GPU power draw. It is recommended to decrease voltage because each semiconductor comes with a design that allows operating within a maximum and minimum voltage range.
If you increase the voltage range, it might damage the component permanently. On the other hand, if there is insufficient voltage, it can generate temporary issues like system instability and visual artifacts. Manufacturers use a preset voltage because the silicon quality varies and depends on production batches.
Try to reduce supply voltage carefully as it helps to decrease GPU power draw and temperature except affecting performance.
You need to decrease the GPU voltage incrementally until the threshold of the system instability. You need to find the goldilocks zone where the GPU is supplied with the minimum amount of power to perform optimally without generating excessive heat and fan noise.
Difference Between Undervolting and Overclocking:
Undervolting means decreasing the GPU voltage during the maintenance of the stock clock speed. Whereas overclocking means boosting the clock speeds.
However, it can vary because users may boost, reduce or maintain the speed as stock during the overclocking procedure. It is not rare for users to overclock the GPU during Undervolting.
It may happen that the GPU you have will need a fixed voltage. Suppose you force the card to run at 1750 MHz 0.95 volts to produce less heat by consuming less power. But for overclocking, you are required to push the GPU at 1800 MHz or 1850 or 1900 MHz.
The result is nothing but performance gain, albeit with more heat generation.
What will you monitor with the help of HWiNFO?
While using HWiNFO, it is essential to watch some factors like how it works, etc.
HWiNFO displays details in 4 columns that are: current, minimum values, maximum values, and average values.
GPU Temperature: It is the current operating temperature of the core of the GPU.
The GPU Core Voltage: It is the current-voltage of the GPU core.
GPU Power: This one is the current wattage of the GPU.
GPU Clock: It is the current core clock.
There is a small clock icon available at the bottom. It is used to reset the readings. The readings need to be reset after each benchmark so that you can ensure the readings are accurate.
Undervolting Workflow:
You must look at these factors: GPU Power (max value column), GPU Core Voltage (max value column), and GPU temperature.
- First, your job is to run the benchmark thrice and then find out the average of the Graphics Score. To do this, you must add all the scores and then divide this by 3. Ensure that you have noted down the value in your spreadsheet.
- Open the spreadsheet, and then you need to write the maximum GPU power, maximum GPU core voltage, and maximum GPU temperature.
- Now, your task is to reset the specifications of HWiNFO with the help of the clock button.
- Then, you can use a modest underfoot. It is recommended to reduce the voltage by 25mV increments.
- Now, you have to repeat Steps 2, 3, and 4.
- Ensure that you are required to do the steps continuously until artifacts are seen on display, or you will see a BSOD. In case you have faced some troubles, enhance the voltage by 25mV.
- After that, you need to perform steps 2, 3, and 4 again. Whether all things are done as you want, you can try another benchmark. You may try the combination of 3D Mark Time Spy with Unigine Heaven. Play any game that you prefer for at least 30 minutes.
Thus, you can undervolt the GPU.
GPU boost, as previously discussed, will increase our card even farther than the specified Boost Clock listed in GPU-Z or on your GPU’s manufacturer website or manual.
After launching HWiNFO and playing a game or running a benchmark, you should know the amount of GPU increased. You are required to test the maximum column of the GPU Clock. You can assure that you will see a figure more than GPU-Boost Z’s Clock.
Requirements:
A few requirements are there that need to be considered before starting the method. For NVIDIA graphics cards, you must not use cards that are below ten series. A few strong reports are there that said some GPUs could not work with Undervolting. Cards above the ten series will work efficiently.
When it comes to AMDs, it is pretty simple to undervolt. Try to do good research as the results can vary from GPU to GPU. Let’s check the methods out for (NVIDIA) and AMD separately.
How to Undervolt GPU (NVIDIA) Using MSI Afterburner:
If you compare the process of undervolting of Nvidia GPUs with AMD GPUs, you can find some additional steps.
Step 1) Download MSI Afterburner:
- This one is a very famous device to undervolt for Nvidia graphics cards. First z your task is to download the software to start the method.
- After downloading, you need to install the software on the PC, and after that, you are required to launch it.
Step 2) Access the Curve Editor:
- When you look at the left part of the MSI Afterburner interface at the bottom, you can see details about the GPU voltage.
- Under the option, a Curve Editor option is seen. Tap two times or press the CTRL + F buttons to access the option.
- As soon as you open the Curve Editor, a graph appears in front of the display.
- In this graph, you can find two essential information pieces. The graph’s X-axis represents the voltage of your graphics card, whereas the Y-axis represents the frequency or clock speed.
Step 3) Test Your Graphics Card:
You should find out the frequency first at which the GPU runs under stress. You are capable of doing this with the help of a GPU-intensive program. If you want, you can run a stress test like FurMark.
What you can do is launch the most resource-heavy game. Then, you can run this for a minimum of 15 minutes. A few games are there that rely on the processor more than the graphics card.
Most newer games put enough pressure on the GPU to show you the correct frequency — especially when played at higher resolutions.
As soon as you launch the program, ensure that you need to use the windowed mode. It enables you to look back at MSI Afterburner. You should look at the section that is labeled as “MHz,” and you have to remember the number.
Step 4) Look for the Correct Axis in Curve Editor:
Now, your job is to return to the Curve Editor device in Afterburner. Then, you need to look for the correct frequency on the Y-axis. After that, you should tap on the dotted curve line until you see the right frequency on the left-hand side. Next, you are required to look at the corresponding voltage. For instance, 1873 MHz needs a core voltage of 1000.
Step 5) Choose a New Voltage Setting:
Undervolting and overclocking are not an exact science. Instead, they are all about trial and error.
- Whether you begin with 1000 mV and a frequency of 1873 MHz, try to reduce the voltage to 950 mV. The numbers vary depending on the graphics card. According to a rule of thumb, you should undervolt inch by inch rather than doing too much at a time.
- You should now tap on the voltage that you are willing to have. The number will be tied to a lower frequency than what you are willing to maintain. Several ways are there that you can follow to fix.
Step 6) Adjust Core Clock:
Now, your job is to return to the main window of MSI Afterburner. Then, your task is to see the Core Clock (MHz) section. It is essential to manage the core clock to match the card’s frequency with the voltage you are willing to maintain.
If you are willing to do this, you should boost the core clock till the curve in the Curve Editor doesn’t change. Whether you want, you may track the voltage that you have selected at the bottom and the frequency. You can see the frequency on the left part of the display. In this case, you should try to boost the clock till the frequency reaches the value as it was during the stress test.
Your card needs to run at a similar frequency while maintaining the maximum voltage. You have to keep in mind that the numbers will vary as these depend on the starting values.
Step 7) Maintain Core Speed and Voltage:
Now, you can change the clock speed and voltage of the graphics card successfully. However, you have to ensure that the values do not reach more than you intended. After that, you have to move to the Curve Editor again and open it to adjust.
Then, you should tap on the voltage you prefer again. Go to the selected voltage point and then drag the small squares down in the highlighted area. Now, make a straight line that is aligned with the frequency your card was touching. If you cannot do this, ensure that the remainder of the curve is available under the highest frequency point.
It makes sure that you will get stable performance at that clock speed.
Step 8) Save and Adjust:
Return to the MSI Afterburner window if you are willing to save the changes. Then, your task is to hit the floppy disk Save icon. It is available in the middle part of the bottom of the display.
Now, try to boot the previous game you have run to put the new frequency or voltage combo to the test. If you use another resource-heavy program, then you should boot this. If you are willing, then you can track values in MSI Afterburner. It ensures that you hit a similar frequency as before undervolting your card. If you haven’t done this, you should boost the core clock a little bit, and then again, you should try.
Run the game for a minimum of 30 to 60 minutes. If you have done everything thoroughly, you will not experience any trouble with your graphics card. If you feel adventurous, you must return and perform the steps again to reduce the voltage.
But in case you have faced any graphical issues or crashes, it indicates that you have undervolted the card extremely. Hence, you can try to perform the steps with a higher voltage maintaining a similar clock speed.
Eventually, you will find the exact point that works best for your graphics card.
Step 9) Stress-Test the Card:
You can treat this as an additional step, but this one is recommended. This step is beneficial to ensure that the new settings and the card work properly. A few programs are there that help stress the card in other ways.
In this case, you can download the FurMark or 3DMark Time Spy. After that, you should run the benchmark up to three times. If you find everything stable, ensure that you have completed undervolting your Nvidia GPU.
How to Undervolt GPU (AMD):
Undervolting an Nvidia graphics card is a hectic job compared to AMD. AMD comes with all essential tools in the drivers for your Radeon GPU. Therefore, you are not required to use any additional programs to perform the process.
Step 1) Enter the Radeon Control Panel:
Those who own an AMD Radeon graphics card must access Radeon Wattman. You can find this available within the Radeon Control Panel.
If you are willing to access the control panel, you need to tap on an empty area on the desktop. Then, you should head towards the Dropdown Menu and then choose the Radeon Control Panel.
Step 2) Open Radeon Wattman:
- You may find the Radeon control panel different and rely on your GPU and drivers. However, it needs to be simple to navigate.
- Then, you have to look for the Gaming section available on the top part of the display and then tap on it. After clicking on this, you need to move to the Global Settings and then head towards the Global Wattman.
- It may happen that you have got a warning from AMD before starting the process. The warning message from AMD is about potential damages to the card.
- As soon as you review the warning, you need to tap on the Accept to launch the Radeon Wattman option.
Step 3) Examine GPU’s Optimal Frequency:
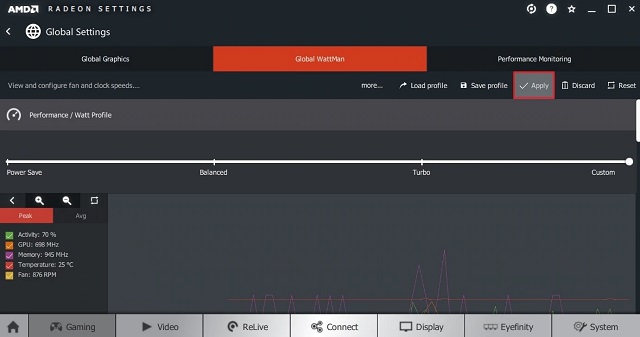
- Like Nvidia, you can use Radeon Wattman to match the optimal clock speed or voltage of the Radeon card. When you are in the Wattman interface, head towards the Tuning Control.
- After that, you need to launch a resource-heavy program ( a new game ) or GPU stress test program ( FurMark). Ensure that you have to run the programs for a minimum of 15 minutes keeping Radeon Wattman open in the background. Then, you should write down the numbers seen near the GPU on the left side of the display. Ensure that you have noted down both the peak core and the average core speed.
With the help of the Tuning Control interface, you can undervolt GPU. If necessary, then give it a shot. But it will be safer if you try it by yourself.
Step 4) Manage the Frequency and Voltage:
- Next, your task is to move to the Frequency or Voltage section of Global Wattman. Hence, you have to change the control to Manual from Auto.
- A curved line appears on the display where you can see your graphics card’s mV and the MHz values.
- While maintaining the frequency, if you are willing to undervolt the GPU, then reduce the voltage.
- Dots within the vertical line represent voltage values. On the other hand, the two white bars available on the curve slide represent the clock speed.
- Drag the voltage and reduce it lesser than the maximum value where your card hits st the desired frequency.
- Reduce the voltage a little bit at first. If you are not willing to use the curved and dotted lines, enter the new values in the boxes available at the bottom of the display. You might need to play around with these till you are not getting the same frequency.
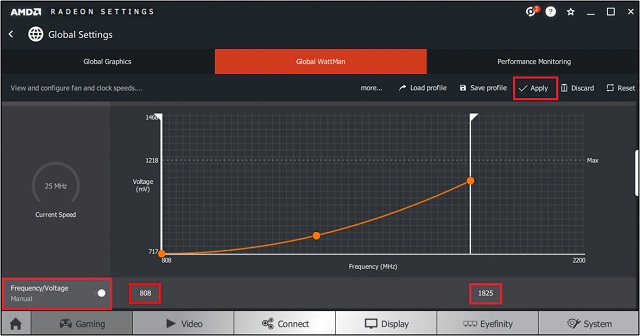 If you are okay with the result, then tap on the Apply.
Step 5) Test Your Graphics Card:
When the method is ended, you need to test longer-term stability. To perform the test, you are required to put your graphics card through another stress test.
You are capable of doing this in different ways. We recommend you to use more than a way to do so. In this case, first, you should launch the game you prefer most and then play it for an hour. If you want, you can go for a GPU stress test or benchmark with the help of FurMark or 3DMark Time Spy. Run the programs for some extra time.
As soon as you have finished the stress tests successfully without causing any crash, ensure that you have undervolted the GPU. In this case, if you are willing to return and perform the steps again, you can do so. Sometimes, you may face GPU issues or crashes. If it happens, it indicates that you should boost the voltage or reduce clock speeds till the problem troubleshoots.
How to undervolt GPU (Later than R7 260, Older than NVIDIA and AMD):
Now, I hope you can understand that selecting any random number will not make your job done.
It is not a matter of luck; it is more about your hard work, patience, and precision. So do minute changes and then verify stability with every step. Before starting the process, it is essential to verify the frequency at which your GPU will run your preferred program. So, you should first find out the state when you begin playing with the voltage.
Hence, you can increase the speed by knocking off 80 or 100 mV in the beginning steps. Whether you find your pc in stable condition, then keep the things ongoing. If you face any trouble or the system is crashed, return and make small changes like 10 to 30 mV each.
Stability indicates that you should put a bit of load on the GPU. Loading an intense program will help you hence. Besides, you can run a game to push the GPU to the limit.
Keep on changing that simulate the minor changes in terms of GPU load.
Ensure that the program you will run should not cause a CPU bottleneck. It is the only prerequisite here.
Keep in mind to save this. If you forget to do so, you need to perform the whole procedure again.
Suppose you have a laptop that comes with an RTX 3060 GPU. You should set up HWinfo64 here to monitor before proceeding.
First, your job is to open the HWinfo64 and then mark the ‘sensors only’ option. Then, you have to tap on the run option.
Settings:
After that, head towards the Settings.
Go to the ‘General’ tab then and change the polling period. Change the disk SMART to 120 cycles and global to 500ms. After that, tap on the Set option. Hit the okay, then.
Scroll the page down till you don’t see GPU monitoring.
- Hence, you should first run Heaven. Move to the ‘preset’ option, and then under this option, you should set this to Extreme. Next, you should change the option to Custom. Then, you need to change the resolution to 1920×1080 and then unmark the option fullscreen. Tap on the run option after that.
- Now, navigate to the HWinfo64 while the scene starts. Then, hit the clock button instantly.
- Allow it to run for 5 minutes, and then you should record the average clock speed. You should ensure that it should run with dGPU, not iGPU.
- Enable Unigine Heaven to run. Then, move to the MSI Afterburner and open it. Hit the Windows icon to turn on the auto startup. Next, you should open the voltage frequency curve in the Afterburner.
- You should keep the Afterburner and voltage frequency curve top-bottom or left-right.
Adjusting Core Clock:
Adjust the core clock bar to the right to +120MHz.
- Tap on the apply.
- Check the curve then to look for the voltage with the closest clock speed recorded by you. To do these, you should tap on those dots in the curve. Next, you should hold the Shift button and drag it to the curve end. A small highlighted area can be seen there.
- Choose the last dot available in the curve.
- Tap on the Apply. You can see a straight line here. If there is no straight line, and then go with the Shift and drag process.
- Finally, do not forget to save it to a profile by hitting the diskette button and tapping on any number.
Conclusion:
Undervolting GPU is a perfect process of reducing power, heat, and noise from the Operating System. It helps to maintain the clock performance also.
Frequently Asked Questions:
- Is undervolting Safe?
Yes, it is safe. If you do this correctly, you won’t face any hardware problems. It increases the lifespan of the GPU as it works at a lower temperature and voltage.
- Is it bad to undervolt your GPU?
No. This process is very useful in decreasing power, heat, etc.
- Does undervolting GPU increase FPS?
The method increases FPS only when your graphics card has crossed the highest clock speed for power or temp limits. However, it helps to reduce power, temperature, and noise.