A clean keyboard is essential in every case, whether you are an accountant, a writer, or a reporter. If you want to store sensitive data, you must have it. You can use a simple microfiber cloth or a mini vacuum, as these are beneficial for maintaining a clean workspace and boosting its lifespan. Several professional cleaning companies exist which don’t clean the device as it can result in cross-contamination of germs or the accidental deletion of folders and files. This article lets you learn how to use keyboard cleaner.
What is a Keyboard Cleaner Spray?
It is a tool used to get rid of dust, dirt, etc., from computers and laptops.
What Tool Can Clean The Keyboard?
The tools which you can use to clean it are as follows:-
- Soft & lint-free clothes
- Q-tips or foam swabs
- Canned compressed air
- Mild detergent solution or spray.
- Isopropyl alcohol.
- Small computer vacuum (optional)
Why do You Need To Clean The Keyboard?
Several reasons exist due to why you may need to clean it. To be honest, all of these are common sense. When you perform the process, it will clean off all germs which can accumulate and lower your probability of getting sick.
Besides, the keycaps won’t accumulate excessive grease or stickiness, which can improve your typing experience.
In addition, a clean keyboard doesn’t break easily. Therefore, you can have fewer crumbs that could enter the cracks of the device or accumulate inside one of the switches.
A clean one is always much better than a dirty one. Besides, you must not want to show your device dirty to your family members.
How Often Should You Clean Your Keyboard?
You should clean its surface quite often. Try to wipe down the device every week with a disinfectant wipe. We advise you to clean deeply every 4-6 weeks of everything that falls between the keycaps every time.
According to a survey, we have seen that only about a third of the people we surveyed follow the ideal cleaning recommendations per month.
Remember that people in our local areas prefer to use a mechanical keyboard as they spend more time on it than ordinary people.
The Keyboard Cleaning Routine:
Once a week: You should wipe the keys down with disinfectant.
Every 4-6 weeks: You need to clean it more deeply by removing keycaps. Thus, you can clear the dust between keys.
The Weekly Clean: Generally, it is better to wipe down the surface with a disinfectant wipe quite often. We advise you to use it once a week. But if you use a shared one, you must wipe it down between each usage to prevent transmission of germs and other stuff.
It is advised to use a microfiber towel sprayed a few times with disinfectant to wipe it down. You must not use paper towels because these have small pieces which could get left behind. Whether you don’t have a microfiber towel, use an old t-shirt or handkerchief.
This once-a-week clean is possible in less than a minute. Its primary purpose is to remove anything which you would directly touch regularly. In addition, ensure that you must wipe up grease, food, germs, etc.
The Monthly Clean: In this monthly or 4-6 week clean, you can remove hair particles, crumbs, or dust bunnies falling between the keycaps. You should disconnect the peripheral device and collect the cleaning supplies.
How to Clean Under the Keys of Your Laptop?
Although a few cleaning tools can reach around the keys, removing these is the best process. If necessary, you should search the laptop’s model to learn how to remove the keys.
Whether you want to remove these, take a picture of the model. Thus, you can remember where they go. Try not to use any tools which could bend or scrape your keys. You can buy a professional “pry tool” repair kit that costs less than $10.
Can You Vacuum Your Laptop Keyboard?
Yes, it is possible to use a vacuum to suck out all crumbs and debris. There are multiple devices with pop-off keys which a standard home vacuum could suck up easily. If you want, use a USB-powered vacuum for cleaning. In addition, it is possible to use various products like cleaning slime. It can mold into its cracks and crevices and stick to debris. Finally, you may use a can of compressed air.
What Are Good Alternatives to Compressed Air?
You should always use compressed air products with HFC instead of CFC (according to the EPA recommendations). You can use a blow dryer on a cool setting or a portable air compressor to inflate tires. There are a few USB vacuum cleaners that come with air-blowing functions.
Can We Clean A Laptop Keyboard With Clorox Wipes?
It is possible to clean a laptop with Clorox wipes. Apple advises using Lysol wipes and Clorox wipes to disinfect Apple computers’ keyboards, mouses, and trackpads. Remember that Apple tells us not to use disinfecting wipes which contain bleach. Although the brand name Clorox is synonymous with the stuff, these wipes don’t have any amount of bleach.
How to Clean Mechanical Keyboard:
These are the most effective steps you can follow in various situations like drink spillage, basic dust & dirt build-up, etc.
Step 1:
Unplug it from the PC carefully.
Step 2:
If you want to remove crumbs or dust, you need to turn the device upside down. Then, you should hold this firmly using one hand while tapping it with the other. In this case, do it over the kitchen sink or outside to keep your home clean.
Step 3:
If you already have one, use an air gun or a compressed air device. It will clean the keyboard by blasting dust out from under the mechanical keyboard’s keys.
Step 4:
You can use a small hand vacuum cleaner to remove dirt. Besides, you can buy special keyboard vacuums from many electronic store chains.
Step 5:
Has water, coffee, or another liquid been spilled on the device? If so, try to use a cloth so that it can absorb as much as possible. You need to leave it for a few seconds to absorb the moisture. If you use a paper towel, try to avoid making any wiping gestures because it can leave paper residue in the gaps of the keyboard.
Step 6:
Once the absorption is about to be done, you must place the device upside down over a bucket. Then, sink for a minimum of two days for all moisture to dry out completely. In addition, remove the keys instantly from the device to ensure that any sticky item is not drying in them. Don’t place it in a room with high humidity, like the bathroom or laundry.
Step 7:
You should wet a clean cloth and wipe it down gently. Hence, you can go with a microfiber cloth.
Step 8:
Whether your device is sticky, use an all-purpose house cleaner in a tiny amount into your cloth to neutralize things that got stuck on the keys.
You must not use harsh chemicals or strong cleaners made to be used for the bathroom. If you use them, your device can become discolored. Then, you should remove the lettering from the keys.
Step 9:
You should take the help of a cleaning gel if required. It is one of the most effective ways because it can also reach areas a cloth can’t reach.
Step 10:
You must clean your keycaps individually. If you find your device dirty or sticky, try to use a keycap puller tool to remove every keycap for cleaning. You might need to clean the base using a pipe cleaner or cloth while the keycaps are off.
Remember that the Keycap pullers are budget-friendly. Therefore, you can find it in most online electronic stores.
How to Clean Laptop Keyboard:
Ensure that you are cleaning it regularly. Otherwise, it can get pretty grimy over time. Oils from your fingers might produce a residue on the top of the key. In addition, crumbs, dust, and pet hair build up in the crevices on this peripheral device. Are you concerned about cleanliness? Don’t worry because you can clean it out yourself. We have elaborated details to let you learn how to clean a keyboard and what you should do to reduce the damage if you spill a drink on it.
Method 1) Basic Keyboard Cleaning:
Step 1:
Before cleaning, you should power off the laptop and disconnect it. Although you should not put liquids directly onto your laptop, you must turn off the power entirely to ensure nothing gets damaged if a bit of moisture does get inside. Then, you should shut down the laptop through the Power Options menu. Next, remove the power cable to keep yourself protected from shock.
Step 2:
Tilt down the upper part of the laptop and then shake this. It will remove large dust bunnies, crumbs, or other debris from the crevices of the external device. Once you get the big thing out first, you can perform better cleaning later. Thus, you can spread a towel under the laptop before shaking it out to make cleanup easier.
Step 3:
You should spread the compressed air between the keys with compressed air to remove dust. In this case, you must ensure that the straw is connected to the Can of compressed air before using it. Then, you should tilt the device to one side and use a laptop keyboard Cleaner Spray between the keys in short bursts from one side to another portion of the device. Next, the air force will remove debris trapped between and beneath the keys. You could get compressed air at stores selling home and office supplies. Ensure not to spray the air while holding the Can upside down because it could cause the propellant to get into the external device damaging the components inside.
Step 4:
You should wipe the keys down using a damp microfiber cloth. Remember that Microfiber can attract dust easily. Therefore, swiping it over the keys can allow you to remove some grime build-up on this peripheral device. Use a lint-free cloth if there does not exist any microfiber cloth.
Step 5:
Use a cotton ball and dip it in isopropyl alcohol to remove stubborn grime. As the alcohol evaporates very fast, it is the best alternative to using water on your laptop. In addition, it can remove the oily residue left by your fingers. In this case, ensure to apply it to the cotton ball first. You must not pour it directly onto the device.
Step 6:
Wipe down the keys to kill germs with a disinfecting wipe. Whether you are concerned about germs like using a shared computer, run a disinfecting wipe over the keys’ surface. Never use wipes with bleach in them because these can damage the protective coating on the keys.
Method 2) Removing the Keys:
Step 1:
You should know about your laptop model if it allows the keys to come off. You need to search for your laptop model online to know its details. There are a few laptop models where you can gently pry off the keycaps. Thus, you can access the surface beneath the keys.
However, keycaps on a few laptops are connected permanently. Therefore, you should search online to learn how to remove the keys.
Step 2:
Ensure that you should remove the keys only when you want to clean underneath them. However, you can remove these small plastic tabs that can easily hold keycaps in place. If you don’t want to damage your device, there is no need to remove the keys unless this peripheral device name backed by is especially grimy.
You must clean under the keys whether you spilled something sticky or found big crumbs trapped under the keys, and it is impossible to get out by shaking or with compressed air.
Step 3:
Before removing the keys, ensure to take a picture of them. It makes sure that you remember where the keys go. It is as simple to remember the order of the number and letter keys. Usually, this input device has special characters and function keys. So, you might get confused.
Step 4:
Use a small flat tool to pry off the keys. Then, you should try to slip the tool edge under the key bottom and gently pry upwards. Remember that the keycap must pop off easily. You must not force it if it doesn’t. Otherwise, you could damage it permanently. Ensure to place the keycaps in a shallow bowl. Or you should keep it in another container to prevent them from accidentally losing it.
If necessary, buy a toolkit from an electronics supply store. It contains small plastic or metal pieces ideal for slipping under the laptop keys. Whether you don’t have any of them, try to use a flathead screwdriver, a butter knife, or even your fingernail.
Step 5:
Use a microfiber cloth or a cotton swab to wipe the space under the keys. Ensure to dip the cloth in alcohol. As the laptop’s inner workings remain more exposed without the keycap in place, you must not use any liquid to clean under your keys. Whether there is no need to tackle a sticky mess, you should dip a cotton swab in rubbing alcohol. Next, you should wipe the spot away carefully.
Step 6:
You must exchange the keycaps. Then, you should place every keycap over its designated space. It ensures that the sides are accurately aligned. You should begin from the bottom edge and hold the key gently until you feel it pop into place.
If the key doesn’t go back on by tapping it back into place, go through the instruction manual for the laptop to check if there are any special instructions for key replacement.
Method 3) Cleaning a Liquid Spill:
Step 1:
You should first power off the laptop, and then you need to remove the battery immediately. Next, unplug the power cable, and then your job is to hold down the power button until the laptop goes off. If the spilled liquid touches the electrical components inside the PC, it will be permanently damaged.
If you work quickly, you can reduce the risk of electrical damage. Whether the laptop begins to smoke or steam, or you view bubbling or bulging, ensure not to touch it. Otherwise, you may need to experience an electrical shock.
Although you dry your laptop, the residue from sugary, acidic, or alcoholic drinks might be there. As a result, the residue could affect the external device’s functionality in the future.
Step 2:
You should turn the upper part of the laptop down over a towel. Then, your job is to open it as wide as possible. Then, your task is to turn down the face and set this on a towel top or another absorbent material. When you flip your laptop over, gravity will pull the moisture away from the motherboard and other electrical components.
Step 3:
Try to blot away liquid as much as possible. Use a microfiber or lint-free cloth to dry the laptop. But if you want to do it quickly, grab whatever is near you, such as a dish towel, paper towel, or even an old T-shirt. You should dry a liquid that is visible on the laptop’s surface. Regular and paper towels can leave tiny particles that can get trapped inside the laptop. That’s why you should go with lint-free and microfiber clothes.
Step 4:
You should keep the laptop dry for one to two days. After that, you can’t complete the method quickly. Although the laptop looks dry from the outside, you might find moisture trapped inside. If you want to be safe, allow your external device at least 24 hours to dry before turning it on again.
Never use a hairdryer to dry the device because it can blow dust into the liquid inside the laptop. As a result, dust will build up inside the laptop, and it will not work correctly.
Step 5:
Go for professional cleaning if the liquid is sugary. Whether you splashed some water into the device, it will be okay but if you spilt a large sugary drink and it is a costly laptop, try to open down the laptop professionally and clean it inside.
In this case, you may need to invest $500, but it will be better if you spend more money on your laptop. If you’re familiar with electronics, take it apart and clean it inside. A few laptops may be dismantled with tools that might not be in your hand.
Step 6:
Finally, exchange the battery and power on the laptop after it is dried. Whether the laptop does not work, give it another 24 hours to dry out. If OS boots up but the peripheral device doesn’t work, exchange it or use a model supporting USB.
Cleaning Gel Basics:
The gel is a new type of product. Therefore, people might not be familiar with it so much. Do you know how it works? It enables you to clean anything. If you find dust on a surface, try to clean it with gel.
What is unique about gel is that this thing can get into gaps. It is why this cleaning process is famous. However, it is suitable for phones, speakers, gaming mice, and video game controllers. But you must be careful while cleaning any exposed wires or electrical contacts. In addition, it can be conductive, so you should disconnect your device before cleaning these surfaces.
Top Nine Best Keyboard Cleaners:
-
BW-100 Non-Flammable Electronic Contact Cleaner Aerosol Spray
Description: It is available in three different sizes of aerosol cans. These are 4oz, 8oz, and 16oz, which can target people with various requirements.
It can evaporate instantly without leaving any residue. In addition, it is useful for computers, controllers, amplifiers, pots, etc.
Features:
Improve Conductivity: This best keyboard cleaner spray helps to improve conductivity by blasting away dust and removing dirt from electrical equipment.
Prevent Contact Failure: If you clean it daily, it will help to prevent contact failure.
Safe to use: You can use it safely on rubber, metal, and most plastics.
Pros:
- Quick evaporation
- Safe to use
- No chemicals of Proposition 65
- Non-flammable
- Straw for pinpoint spray
Cons:
- Not usable on the camera lenses
-
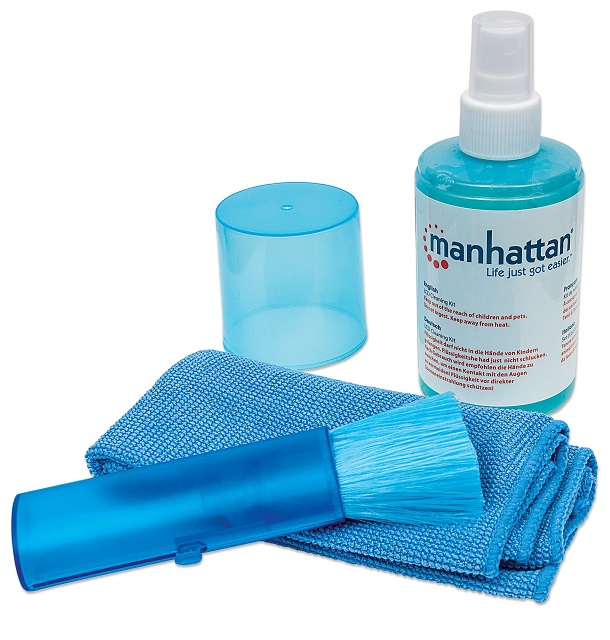
Manhattan Screen & Keyboard Cleaner Kit
Description: It offers a three-year warranty. Besides, it includes a cleaning solution of 6.75 oz, a Microfiber cloth (12 x 12 in.), and a Soft Brush (5.5 in.). In addition, the device helps to restore and maintain brightness & clarity. Moreover, the sticky key keyboard cleaner spray is perfect for use with flat panel displays, notebook computers, handheld devices, keyboards, etc. It has a soft brush which gently removes excess dust and debris without scratching.
Features :
Cleans Screens: You can keep the screens cleaned easily, and clarity will be restored.
Safe To Use: This solution does not contain alcohol and won’t damage your devices.
Never Scratch Screen: The brush and soft microfiber cloth help to dry the screen without creating scratches. Thus, you can get a clear non-streak finish.
Use: You can mostly use computer keyboard cleaner spray for electronic device screens. We don’t recommend using it on anti-glare, privacy, or polarized materials, though.
Pros:
- Safe to use
- Three-year warranty
Cons:
- Leave a thick film
-
Falcon Dust, Off Compressed Gas (152a) Disposable Cleaning Duster
Description: It is indispensable for areas where the space is tight. Besides, the product has similar efficient blasting power as bigger models. In addition, it is 100% Ozone safe Bitterant.
Features:
Ozone safe: The model is 100% Ozone Safe.
Multi-Functional: This keyboard cleaner spray for a sticky laptop is versatile.
Pros:
- Versatile
- Ozone safe completely
Cons:
- It may fry electronics
-
iDuster Compressed Canned Air Duster
Description: It includes a small plastic part which can prevent triggers from being pushed to release the compressed gas. The plastic must be broken and removed before the trigger can start working. In addition, it has a disposable compressed gas duster (152a) where every can contains 10 oz.
Features:
Remove Dirt: The product can remove lint, dust, and other contaminants from spaces you cannot easily reach.
Perfect for Usage: You can use it for CPUs, Computer mice, and workstations, labs, repair benches, household use, on-location photography, etc.
Pros:
- 100% Ozone safe
- Used in computer mice, workstations, etc
Cons:
- Not good support from the seller
-
Dust-Off Disposable Compressed Gas Duster
Description: The product can easily remove lint, dust, and other contaminants you cannot easily reach.
Features:
Suitable: You can use it for cleaning cups, computer mice, and workstations.
Ideal to use: It allows you to use it in collectables, figurines, and window blinds.
Durable: This model can last for longer periods. Besides, it contains no CFCs, huffs, propane, or butane.
Pros:
- Long-lasting
- Perfect to use
Cons:
- Sometimes, cracked Cans may arrive
-
Dealswin Store Rechargeable Mini Vacuum Cleaner
Description: This portable model is lightweight and comes in a mini size. Besides, it is easy to carry anywhere you go. Moreover, the package comes with a USB data line. Therefore, it is possible to charge anytime by plugging into the USB port.
The product has two types of straw that can be replaced. Besides, there exists a flat nozzle that is possible to inhale small paper pieces. In addition, brush nozzles can dry ash and dust.
Features:
Long-lasting: This product can continuously work up to an hour after being fully charged. Besides, it comes with a washable filter, nozzle, and brush which can keep it durable.
Powerful Suction: It has a default rechargeable battery, and the rated output power is 8W. There are two side air vents used for heat radiation. Ensure that you should keep it adjacent to the plane.
Broad Application: This versatile product can be used in desktop/ laptop/ keyboard/ air container’s vent or dust in small gaps. In addition, you can use it for cigarette ash in car lighters, bread crumbs & paper scraps on the desk, pet hairs, particles in makeup bags, etc.
Pros:
- Multi-functional
- Wide application
Cons:
- Long charging time
-
ColorCoral Cleaning Gel
Description:
If you are looking for a cleaning gel, you must use this product. It picks up any dirt & debris while being moved across the keyboard since it is sticky.
However, you must consider consistency. It is because gel products degrade over time. So, losing its viscosity can make it hard to remove from the external device.
Features:
Adjustable: The product allows you to mold and shape it to suit the best angle. Thus, it can remove debris even from those areas which are hard to reach. Therefore, it becomes a versatile cleaning option.
Lemon-Scented: This model is lemon-scented. Therefore, once it has been cleaned, it will also smell good. As soon as you do this, you will find it biodegradable too.
Pros:
- Biodegradable
- Lemon-scented
- Adjustable
Cons:
- It might turn into a goopy liquid after first use.
-
Hagibis Cleaning Soft Brush Keyboard Cleaner 5-in-1
Description:
It is an effective cleaning solution. This 5-in-1 cleaning kit features a flocking sponge, nylon bristles, a high-density brush, a keycap puller, and a metal pen tip. Every option helps to clean the hardware. For example, it is possible to use a high-density brush to clean the dirt on the sound outlet of the earphone. In addition, the keycap puller enables you to clean inside and outside the peripheral device. Finally, you must wash the keys whether you are on a deep cleaning mission.
Its slot-cleaning head can be pulled out. Besides, it is possible to change its direction to get a better angle into the most challenging spots. Its excellent design and finish make it a versatile tool you can use on different equipment.
Features:
Separated Dual Head Design: It includes Nylon Bristles, Flocking Sponge, High-density Brush, Metal Pen Tip, and Keycap Puller. The dual-head hidden design of the product can meet your different cleaning requirements.
Soft Brush: It has a nylon brush with moderate softness and hardness. In addition, its three-row design with high pore strength makes it unique. Moreover, it has good elasticity, stiffness, and compactness.
Multifunctional: A flocking sponge is used to clean the dust in the wireless charging case of the earphone. In addition, the brush allows you to clean the dirt on the sound outlet hole of the earphone. Finally, with the help of a metal pen tip, it is possible to clean stubborn dust.
Simple to Pull Keys: The key puller allows you to change the key cap. Thus, you can easily remove the key cap.
Simple to Use: It has four different cleaning heads. Besides, it can perform a deep cleaning of every corner of the external device.
Pros:
- Versatile
- Easy to use
- Dual head design
Cons:
- It can be broken while using
-
UPPERCASE GhostBlanket Screen Keyboard Imprint Protection Microfiber Liner and Cleaning Cloth
Description: It comes with a top-quality microfiber blend, especially for the MacBook. The Microfiber cloth helps to protect the display from imprints, oil transfers, and other contaminants. In addition, the product can prevent the transfer of marks from the external device to the screen when your laptop is closed.
Features:
Long-Lasting: It uses a premium, long-lasting high-density microfiber blend with 0.4mm thickness.
Trimmed Edge: The precision laser trimmed edge can offer durability with superior tear resistance.
Superior Power: This power helps the model to remove fingerprints, smudges, dust, grime, oil, and dirt from screens and other smooth surfaces.
Dimensions: It comes in 11.4 in. x 7.3 in. (290mm x 186mm) dimensions.
Pros:
- Superior power
- Long-lasting
- Trimmed edge
Cons:
- Stiff material
The Keyboard Cleaner Spray Buying Guide:
Compatibility:
First, decide which type of cleansers and tools you want before purchasing any model. If you have flatter keys on a laptop keyboard, you can get rid of dust quickly using microfiber cloths, wipes, and soft bristle brushes. The best solution is to use a firm bristle brush, a cleaning solution, or compressed air. If you want to remove dust from your laptop and this peripheral device, use cleaning gels.
Safety:
Several websites recommend using rubbing alcohol to clear them. But some allegations say alcohol can harm keys. In this case, you should consult the owner’s manual.
Effectiveness:
Purchasing wipes or a spray often containing disinfecting agents is recommended. Use a firm bristle brush, cleaning gel, or a small vacuum to remove dirt. Thus, you can prevent them from building up between the keys. If you want to get rid of smudges and fingerprints, use a microfiber cloth.
Brand:
Brand plays a vital role in purchasing the best model. Different brands produce keyboards, including Microsoft and Logitech. If you know what these companies use in their models, it will help you to buy them. Thus, you can make an informed decision while buying.
Features:
It is a crucial factor you should consider before making any decision. A few have viruses on them, while others could clear the outside of the keys. Choose a model with multiple features if you want something used on all keyboards.
Hence, you should go through reviews and take recommendations from friends who have computers or people working in IT departments.
Price:
Remember that a good product never costs you plenty of money. But it has to be effective at clearing dust. Thus, the peripheral devices remain healthy and safe to use throughout the day without having any issues with infections or dangerous germs getting into your fingers while typing on them all day.
The Bottom Line:
Several keyboard cleaners are available, so you might struggle to choose the correct one. But before buying, ensure that you can remove the dust easily with the selected product. For example, if you want to wipe down quickly using a microfiber cloth, it will remove dust which is possible to reach.
Frequently Asked Questions:
- What cleaner can you use on your keyboard?
It is possible using rubbing alcohol, cotton swabs, and a lint-free cloth.
- What is the best way to clean the keyboard?
These are a few tips to do so.
- Never keep your peripheral device dirty.
- You should not shake the laptop.
- Get Some Air.
- Try a Dust Vac.
- Use Screen wipes for Caked-On Grime.
- Use Cotton Swabs between the Keys.
- Can you spray cleaner on your keyboard?
You must not spray liquid onto this external device because it could cause water damage. Also, ensure not to submerge it in water.