Android Pie Beta has been the talk of the town since its launch. The new Android version was launched in August for Google pixels devices and later it is has been rolled out for the number of other devices.
Although it has been rolled out for the number of devices, it hasn’t yet rolled out officially in Samsung devices. So, people who are using Samsung Galaxy devices are often checking the Oreo updates timeline to upgrade to Android Pie Beta.
But it isn’t happening in Samsung Galaxy devices. When you have a glance at the oreo update timeline, you can see the message that ” Android Pie will officially touch down on November. But still, there is no confirmation of the date and other details.
It was making Samsung users frustrated because the Android Pie Beta finally version is going to be rolled out in the first quarter of 2019, but still, they haven’t got the August Released Android update on their devices.
Step By Step Guide to Android Pie Beta Update
If you are the one who is striving to get your hands on Android Pie Beta updates for your Samsung Galaxy S9 or S9 +, then don’t worry you can quickly know how to get Android Pie Beta on Galaxy S9 or S9+ in this article.
This beta version is yet being released in the first quarter, but the leaked version has already hit the internet and opens the floodgates for developers and other users to test the newer version.

Although this is a leaked version, it is reasonably stable “ Android Pie Beta update”. As this isn’t officially released Android Version, you have to be careful. This version of Android P is not a final version of Android 9.0, so it might have some bugs or other issues.
So, you have to make up your mind while trying this on your Samsung Galaxy S9 or S9+ devices. Along with that, there is a high risk of data loss during the installation process. So, if you are tester or developer who wants to try this on your latest Samsung Galaxy S9 0r S9+ device, then you can try this with extreme caution.
So, let’s get into the topic ” How to get Android Pie Beta on Galaxy S9 or S9+ Right Now”.
Now to go through with this process “how to get Android pie beta on Galaxy S9 or S9+ you have some requirements.
Reminder:
I’m once again reminding you that it’s essential to note that this is a leaked update, so you don’t need to flash it into your device from an External source.
Here are the requirements you need to go through with this process:
- Unlocked US Galaxy S9 (G960U or G960U1)or S9+ (G960U or G960U1) Versions,
- Need ADB & Fast boot Installed on the device.
- Windows Desktop with Samsung drivers installed.
- One Samsung USB-C Data Cable.
First Step: Download Android Pie Beta Firmware File for your respective device:
The first thing you need to install Android pie on your Samsung Galaxy S9 or S9+ devices is the firmware file of Android Pie. This firmware file will be used to flashing with Odin.
Now, Download the leaked Android Pie beta version for your respective model from links below and save them your computer. This file is relatively larger than standard packed versions, so you have to wait for some time till it finishes downloading.
- Download the Android 9.0 Pie beta for the Galaxy S9
- Download the Android 9.0 Pie beta for the Galaxy S9+
Second Step: Carefully Check Android Pie Beta Firmware:
After the first step, next, you have to check the current version of your S9 or S9+ device. So, to verify that you have to open the settings apps and follow the below process.
Process:
- Go to the settings app.
- Tap on About phone option.
- Then select ” Software Information.”
- After that check out ” Baseband Version” on the page.
- If you see baseband version ends in “AR16” then directly you can skip this process and go to step 6.
If not just follow the below steps to reach your goal manually.
Download the Latest Oreo Update:
As you do not have the “AR16” version, you have to start from scratch. Just by flashing the latest Android Oreo version by merely using Odin on your computer. If you want to download latest Oreo update, then download the zip file from below links and then extract those files on your computer and then access them it’s that easy.
- Download Samsung ROM flashing Tool for Android — Latest (ODIN)
- And then Download Latest AR16 Oreo for the Galaxy S9.
- Download the lastest AR16 Oreo for the Galaxy S9+
Third Step: Enter Download Mode in Galaxy S9 & S9+ and Connect to PC:
After downloading the files extract those files from the zip file and save in your PC. Then pick your galaxy device and boot your device into the Download Mode. Also, don’t forget to install ODIN on your PC.
Process:
- To go for Download Mode firstly power off your phone.
- Then press and hold both the volume down button and the Bixby.
- After that press and hold the power button.
- Now release all the three held buttons once it enters into the download mode. (Screen displays blue screen)
- Finally, press volume up button to enter into the full download mode.
- Connect your download mode mobile to your computer by using a USB data cable.
Fourth Step: Prepare your files in ODIN:
Once you have connected your Download mode Android phone to the PC, you will establish a connection between S9 or S9+ and your PC. Now follow below process to prepare files to get ready for installation.
Process:
- Firstly, go to the “.Exe file” of the ODIN.
- Right click on the ODIN and choose ” Run as Administrator”.
- If you have set a password for your windows means you have to enter the login credentials only when it prompted to do.
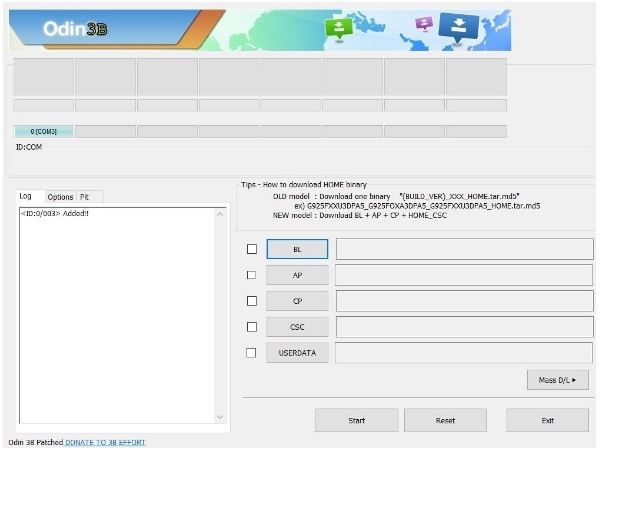
- After that, you’ll see “Added” with the ” LOG” box.
- Along with that, you can see the light blue bar on the top left promoting that ODIN is connected to the Device.
- Now, if you don’t see that then close ODIN and unplug the Galaxy device from the computer.
- Then restart from re-entering download mode and reconnect to your Computer.
- If the connection is successfully established between Odin and your Device means you are good to go.
- Be careful and make sure that the program is perfectly connected or else you can potentially lose your information.
- To make sure click on the “Option” tab on the Odin box at the lower left-hand side of the program.
- Now, make sure that “Re-Partition” option is not checked on.
- If you checked it, please uncheck that option this will help you.
Fifth Step: Flash the downloaded Oreo update on your S9 0r S9+ Device:
Once you set Odin correctly, you have to flash the Orea update on your S9 or S9+ device. You have to flash Orea then only you can update the Android Beta version. So, you have to flash the Orea update on S9 or S9+ device carefully.
Follow the process:
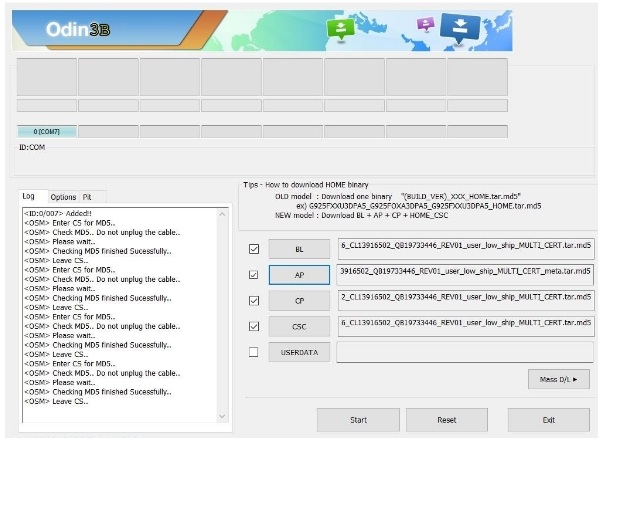
- Firstly, Click on the “BL,” “AP,” “CP” and “CPC” boxes one by one and then you have to select the corresponding files which are having matching letters on the beginning of their file names.
- Make sure you leave the ” USER DATA” field, Blank.
- Now it may take some time when you load the file starting in ” AP” as the file is more prominent.
- Sometimes you can also see the unresponsive page for a couple of minutes, but don’t close it.
- It is normal when the big files are processing in ODIN.
- So, just sit back and let the process complete.
In the process you can see CSC file it is the same file you have downloaded for this process. Although most of the people say that misconfiguration of using CSC file will wipe out data, but it doesn’t do any harm. Even though it is best to be careful so cross check twice while selecting CSC file. After the process is completed, you are ready to flash your S9 or S9+.
- Just hit ” start” button to run the process.
Note: If you got stuck in between the “process” or flashing is unsuccessful means you have to again start from the Step 3. If you again see this problem arises means I recommend to change the data cable and try again with the best possible data cable to fix the issue.
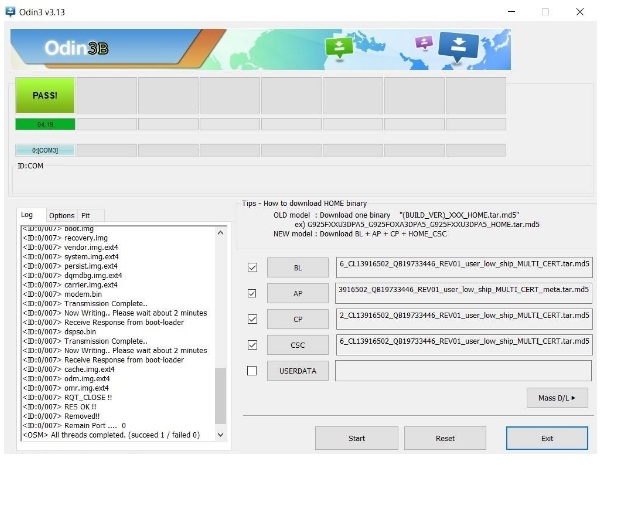
In general, the flashing process will take at least 5 minutes to complete so sit back and relax, but don’t tweak any settings or do anything crazy while the process is going on. Once the process is completed, you can see “Pass” in Green color on the left of the program screen.
Sixth Step: Enter into the Recovery Mode:
As you have successfully installed the Orea update now, you have to update that to the Android Pie. Now to do this, you have to first enter into the Recovery mode in your Galaxy device.
Process:
- Firstly, switch off your Android device.
- Once it is Switched off then press and hold the “Bixby” and “Volume up,” buttons then press and hold the “power button.”
- Leave the power button when phone boots up.
- After that leave the remaining buttons once you see the blue screen.
- Now the blue screen will automatically transfer to the recovery screen after the phone fails to detect any command.
When the phone entered into the recovery mode then advance to the next step. “ Opening the ADB”.
Seventh Step: Open ADB ( Android Debug Bridge):
After completing the above process, you have to finally run the ADB command on the Android Pie Update on your S9 or S9+ device. You should be opening a command prompt in the tool folder inside the ADB installation Directory. Apart from that, you’ll also have to select ” Apply update from ADB” in your recovery screen on your S9 or S9+ device.
If in case you have done a default installation on SDK tools from Google means you have to head to the
C:\Program Files (x86)\Android\android-sdk\platform-tools folder.
Or else go to the folder where you have installed ADB and open the tools folder within the page.
Once you are inside the folder press and hold on the shift button on your PC keyboard then right click on the window and choose “Open Command Widow,” or you can input the “CMD” within the folder’s address bar.
There is another option for this that is if you have enabled ADB to run on any folders in your PC then you can open command on the update file’s folder easily.
Now enter the below command in the terminal and just hit enter. Click on the Next Step once you are done.
adb start-server.
Eight Step: Finally, Update to Android Pie Beta:
Now, you have done all the hard work to come here. Finally with ADB and running the command input “Adb sideload” followed by a space.
Then the location of the update ZIP file.
Ex: IF download file is named as Androidpiebeta.zip in your PC then you have to input the command same as follows.
adb sideload C:\Users\juanm\Downloads\piebeta.zip
At this time if you opened a command prompt within the update file’s folder means you have to type in command along with the name of the .zip file.
adb sideload piebeta.zip
Always be careful and make sure you type all commands accurately and then hit Enter. That’s it.
It will now be updated Orea to the Android pie Beta Version Via ADB, although it takes a couple of minutes this process will be completed.
Its status will be displayed in percentage with the command prompt. It will work correctly until you do anything wrong. After the process is completed your device will automatically reboot, and then you can enjoy the Android Pie Beta Update.
By this process, you can successfully update galaxy S9 or S9+ to Android pie beta. I hope you all like this topic “How to get Android Pie Beta on Galaxy S9 or S9+ Right Now”. Although this Android Pie Beta is not official but it’s worth a try. Try and have fun with Android Pie Beta.