Are you striving to find out how to repair windows 10 using command prompt? Then don’t worry; in this post, you’ll find out how to repair your windows 10 by using Command Prompt.
Usually, when there is a problem with your windows operating system. Most of the people repair it with some basic repair tactics such as windows directory repair, boot directory repair, and so on. Some people will restart their device to resolve the issues automatically.
If at all, the window 10 is not responding means, you have to go to the advanced repair options. But, for instance, if you are striving to find out how to repair windows 10 using command prompt means you can get the information in this post.
In this post, I’ll let you know How to Repair Windows 10 Using Command Prompt using different methods by which you can fix windows 10 using the command prompt.
How to Repair Windows 10 using Command Prompt:
Whenever you encounter any problems that you usually can’t solve in windows 10, you can solve them by using Command Prompt. If, in any situation, you only had a chance to boot into safe mode with command prompt means, you can still repair your windows 10 through command prompt tool before you try reinstalling the windows 10.
Let’s get into the different methods to repair windows 10 using the command prompt.
How to Enter Windows 10 Safe Mode with Command Prompt:
If you have access:
If you are having access to your windows 10 means, you can enter safe mode by simply clicking on the Shift and Restart button” from Start Menu. Then click on (6) from Startup Settings to quickly boot the system into safe mode with command prompt on the next restart.
If you don’t have access:
In case, if you are not having access to your windows 10 at all means, you need to “Hold and Press Power Switch” on your system for 5 seconds or until it’s completely turned off.
After that, power it on again. When the system starts loading windows 10, just hold and press the power switch back to force shutdown. Repeat this process for around 3-4 times so that windows 10 will automatically boot into Windows recovery mode.
When windows recovery mode displays, select Troubleshoot option — Advanced Option — Startup settings.
From that, press 6 key to boot into safe mode with command prompt on for the Next Restart.
How to open the command prompt from Windows 10 Recovery:
If you want to open the command prompt from windows 10 recovery, then you have to go to the start menu.
- Go to Settings.
- Click on Update & Security
- Then click on Recovery
- After that, choose Advanced Startup.
- Press Restart Now to boot into the Windows Recovery mode.
In case if you can’t access, your windows 10 PC means, follow the steps as mentioned above to force shutdown your PC to get into windows recovery mode.
Once you are into that recovery mode, follow the below process.
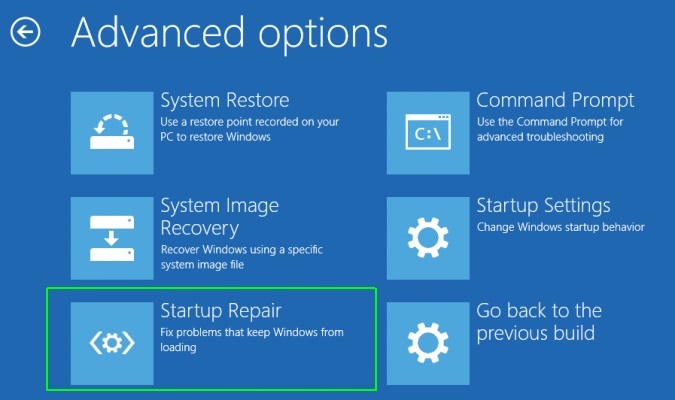
- Select the Troubleshoot option.
- Click on Advanced Options
- Then click on command prompt.
From there, you will be able to execute or run the commands from the windows recovery CMD Mode. If you have a recovery drive, then this process won’t be needed as you can boot the recovery drive to enter recovery mode.
Method 1: How to Repair Windows 10 Using SFC?
SFC is nothing but the system file checker. It is a command-line utility that can scan for all the corruptions in Windows 10 System files, and it can replace any corrupted or missing protected files with Good version files. Whenever you feel bug with your computer or even notice problems during the booting process, you can repair it with SFC Method.
The process to fix windows 10 using SFC:
Firstly, open “Start” and search for command prompt.
Then Select the Command prompt and run it as administrator.
Type the command: “sfc/scannow” and press “Enter.”.
This will fix most of your problems if it’s unable to fix your problem then your utility cannot get the required files to resolve the issue. So, you can use another method in that situation.
Usually, this process may be 30 mins or up to several hours, mainly depending upon the size of windows system files and your system performance. When the scan is completed, choose to restart your system to verify whether the problem is resolved or not. If the problem persists, move to the next method.
Method 2: How to fix & Repair Windows 10 using DISM?
Windows 10 has a command-line utility known as DISM ( Deployment image servicing and management). This DISM Command in windows can be used to repair windows images, windows setup, recovery environment, and so on.
It can also fix the recovery image within the installation of operating systems as well.
Process of Repairing:
Firstly, check whether there is any corruption by running the command line as an administrator.
Then type below syntax and click enter.
DISM /Online /Cleanup-Image /CheckHealth
To quickly scan the Windows image for any corruption, you can use the below command and click enter.
DISM /Online /Cleanup-Image /ScanHealth
To quickly fix the windows image, click on the command line below and hit enter.
DISM /Online /Cleanup-Image /RestoreHealth /Source:repairSource\install.wim
Method 3: How to Reset Windows 10 with Command Prompt?
If you want to reset windows 10 with ” reset this PC” means follow the below instructions:
Type “systemreset-cleanpc” in a command prompt and click on Enter. In case, if your computer cannot boot means, you can boot into recovery mode by selecting “Troubleshoot.”
Method 4: How to run System Restore with CMD?
If your problem is too severe, then you can restore your Windows 10 to the previous state by enabling system restore.
But these will not restore documents, personal files, emails, and so on.
The process to Run System Restore”:
- To run the System Restore in safe mode, start your computer and press “F8” continuously until windows advanced options appear.
- Click on “Safe Mode with CMD” and click enter.
- If your computer boot normally, then type “CMD” in the start menu search box and click “Command Prompt” to continue.
- Then sign-in using the administrator account if you need it.
- Enter “rstrui.exe” at first in command prompt window and click on “Enter” to continue.
This particular command will bring you an interface of system restore.
You can click on the restore point or click “Next to choose other restore point options. Then follow the onscreen instructions to complete the system restore.
Method 5: How to fix windows 10 with AOMEI.exe?
Apart from system restore, you can also fix your windows 10 with AOMEI.exe. This is a backup command, which is a reliable backup and restores software that is specially designed for windows Visa/XP/7/8/10.
With this, you can either back up your system and restore it from the graphic user interface or the command line. This has some features that the built-in Windows tool does not have.
Ex: AOMEI Backupper can be used to create an incremental backup, and even used to restore dis-similar hardware.
For suppose, if you have created system image backup with AOMEI Backupper. Then you can use a utility name check image to check the system image backup before restoring the system.
Process: Use the following steps to repair windows 10 with AOMEI.exe:
Firstly, navigate to the AOMEI Backupper installation directory just by typing below command on CMD and press “Enter.”
Command: cd C:\Program Files (x86)\AOMEI Backupper
In case, if you run a command under windows PE then drive letters such as C, D, E, and so on might change.
Run below command to start the restore process.
Command Explanation: AMBackup /r /t [ backup type /s “[backup location path]” /d [ Desitination location]
Ex: if you want to restore the system backup, which is saved in “H:\systembackup1 to disk 1”. You should type the command like the following.
AMBackup /r /t system /s “H:\system backup \systembackup1.adi” /d 1
Note: In case, if you need to restore another computer, AOMEI Backupper “Universal Restore” feature can be handy.
Method 6: Running CHKDSK to check for hard drive errors:
Hard drive errors are one of the most common mistakes that usually cause trouble to corrupt the windows 10 or crash it. If you run the check disk (Chkdsk), it will help you to check and quickly repair unwanted disk errors on your system HD.
As you are trying to resolve and repair your windows 10 using Command prompt, you can run this command to perform check disk.
To run this command, you have to enter below command:
Command: chkdsk c:/f
As you’re not using your disk, chkdsk will not ask to restart your PC. If it suggests that volume is in use and schedule chkdsk scan on your system next restart, then you can press Y to proceed.
For the system file check, the scan may take some time. So, don’t interrupt the scan; whenever it’s completed, then restart your PC and verify your problem still persists or not.
Method 7: Bootrec to fix windows 10 boot problems:
If your system is facing boot problems, then you have to run bootrec. Bootrec.exe is one of the useful tools to repair boot problems in windows 10. Whenever startup repair can’t resolve your windows 10 boot problem, then you should try our bootrec repair tool.
All you have to do is enter the below commands in Command prompt and hit enter.
bootrec /fixmbr
bootrec /fixboot
and
bootrec /rebuildbcd
bcdboot c:\windows /s c:
These are the commands which are useful to execute bootrec.exe to fix the master boot record and other boot problems quickly. In case, if your windows 10 is stored in D drive means replace C: with D: and reboot your computer after executing all the commands.
These are the best ways to repair windows 10 using command prompt. If you are striving to check out more then you have to follow our blog as we regularly update these posts with new tactics.